

Introduction (Level 1)
Welcome to the VBC tutorial for the Vonage Integration Suite (VGIS). The Vonage Integration Suite is a managed browser extension that merges both voice and data in key applications for sales, customer service, and business productivity.
Installing Vonage Integration Suite
Users can access steps on installing the Vonage Integration application via the welcome email, or they can manually download it from their default web browser.
To access the steps on downloading the integration application, from the welcome email:
- Click on the link found under Step 1. This will bring you the Vonage site.
- From here, navigate to Step 1 and expand this section by clicking on the name.
- Choose your web browser and follow the steps.
- Once completed, you should have downloaded and installed the Vonage Integration Suite.
To successfully download the application via your browser, you must locate the app within the browser’s store.
Google Chrome:
If you’re using Google Chrome as your browser:
- In your search field, search for the Chrome Web Store.
- Click on the link to access it.
- In the search field, type in Vonage Integration Suite.

- Once the results populate, locate the app and open the page.
- Click on the +ADD TO CHROME button.

- A small pop window will appear asking to allow the application to be installed.
- Click Add Extension.
Once finished, you should see a confirmation window as well as the Vonage V icon in your browser toolbar.
Mozilla Firefox:
If you’re using Mozilla Firefox as your browser:
- In your search field, search for Firefox Add-Ons.
- Click on the link to access it.
- In the search field, type in Vonage Integration Suite.
- Once the results populate, locate the app and click on the +Add to Firefox button.
- A small pop window will appear asking to allow the application to be installed.
- Click the Add button.
Once finished, you should see a confirmation window as well as the Vonage V icon in your browser toolbar.
Microsoft Edge:
If you’re using Microsoft Edge as your browser:
- In your search field, search for the Microsoft Store.
- Click on the link to access it.
- In the search field, type in Vonage Integration Suite.
- Once the results populate, locate the app and click on the Get button.
- Click on Launch.
- On the menu to the right, click Turn It On.
Once finished, you should see a confirmation window as well as the Vonage V icon in your browser toolbar.
Opera:
If you’re using Opera as your browser:
- In your search field, search for Opera Add-ons.
- Click on the link to access it.
- In the search field, type in Vonage Integration Suite.
- Once the results populate, locate the app.
- Click on the Add to Opera button.
Once finished, you should see a confirmation window as well as the Vonage V icon in your browser toolbar.
Auto Pop Up Manager
This application allows you to configure auto pop-up settings to make the use of the application simpler. To access these applications settings:
- Click on the V icon in your browser’s window.
- Once the application has opened, click on the profile avatar in the upper right corner.

- This should generate a drop-down menu. Select the settings icon.
- The Setting window will appear.
- Under Global settings, click on the Auto Pop Up Manager.

- You have the ability to create rules or criteria for Inbound, Outbound, and Internal interactions.
For this guide, let’s create an Internal rule, but the steps for creating an outbound internal rule are similar. First:
- Click Add Rule under Inbound.
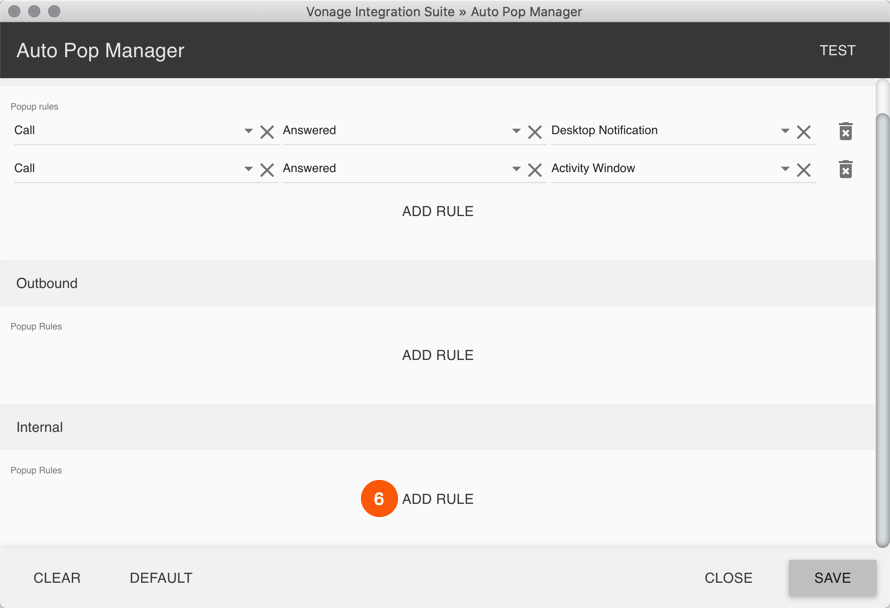
- From the Type drop-down menu, select whether it’s a:
- A call
- An SMS text message
- A voicemail.
- Select Call.

- Proceed to select the State from the corresponding drop-down menu. You have the options to select:
- Answered
- Missed,
- Rejected
- Released (answered)
- Ringing.
- Pick Answered.
- Lastly, from the Pop Up drop-down menu select where you would like the pop-up to happen. Either Activity window, desktop notification, or main panel.
- Choose Activity Window.
- Click Save.
If you wish to add another rule, follow the steps above. Once finished and no other changes are required, click on Save.
Signing in to Office 365
Once your activation is complete, you can now register Office 365 with the Vonage Application. To start:
- Click on the Office 365 Sign In button.

- Enter your credentials and proceed to click through the options that appear to allow the apps access into Office 365.
Please Note: For full functionality, please contact your Office 365 Admin for them to give the domain additional access. Please go to:
https://login.microsoftonline.com/common/adminconsent?client_id=8b17b99c-726c-4247-ad8a-861a0e9f6817&state=12345&redirect_uri= https://www.getpostman.com/oauth2/callback
- Once on the page, click the Accept button to complete the action. A blank browser page may appear, you may exit as needed.
Click To Dial
The Vonage Integration app includes a Click-to-Dial function. With this feature, when numbers appear on your screen, like on a website’s contact us page, you can simply click the phone number and enable a call through your Vonage application:
To use click to dial, navigate to the Contact Vonage Customer Service webpage, you will notice a phone icon to the left:

- Click on the phone icon, a dialog box will appear with the number in place.
- Proceed to the click the Dial button.
- Once clicked, a call will ring your Vonage Device, you will need to answer your Vonage Device for the call to be completed.Your call will now be placed.
You can also send SMS messages through the Click to Dial screen. To send an sms message, navigate to the Contact Vonage Customer Service webpage, you will notice a phone icon to the left:

- Click on the image, a dialog box will appear with the number in place.
- You will see two icons to the left, the SMS icon and the phone icon. Click on the SMS icon to start your message.
- Enter the message in the respective field.
- Once complete, click on the arrow to send.
Please Note: This message will only be received by the recipient if their number allows SMS messages.
Make Calls or SMS Messages
To make a call, from the Vonage application:

- Click on the Dial Pad icon.
- Enter a valid 10-digit number.
- When complete, click the green call button.
The Vonage Integration app includes an SMS function. With this feature, you can send and receive SMS messages. To send an SMS message, from the Vonage application:

- Click the Dial Pad icon, the dial pad will appear.
- Proceed to click on the SMS icon.
- Enter a valid 10-digit number and message.
- When complete, click the green send button. All incoming messages to your Vonage application can be viewed through the Call History or Call Activity windows.
Reports
To run Reports through the Vonage app:
- Click on the V icon to open the application.

- Once the application has been opened, click on the profile icon in the upper right corner.
- This should generate a drop-down menu.

- Select the Reports icon, your browser should open to the report generator.
You have the option to run a Report Summary or a Detailed Report. Let us walk you through both. To run a Summary Report, make sure the Summary tab is selected:

- Click the From drop-down menu and select the date you wish this report to start.
- Proceed to select the date you want the report to end on from the To drop-down menu.
- Then, select the time interval from the drop-down menu. This could be hourly, weekly or monthly.
- Finally, select which calls you would like to monitor, from ALL, Incoming or Outgoing from the drop-down menu.
As you enter the corresponding information, data will appear within the table. If you would like the data to refresh on its own, from the auto-refresh drop-down menu, select the time frame you wish it to renew.
To run a Detailed Report, make sure the Detailed tab is selected:
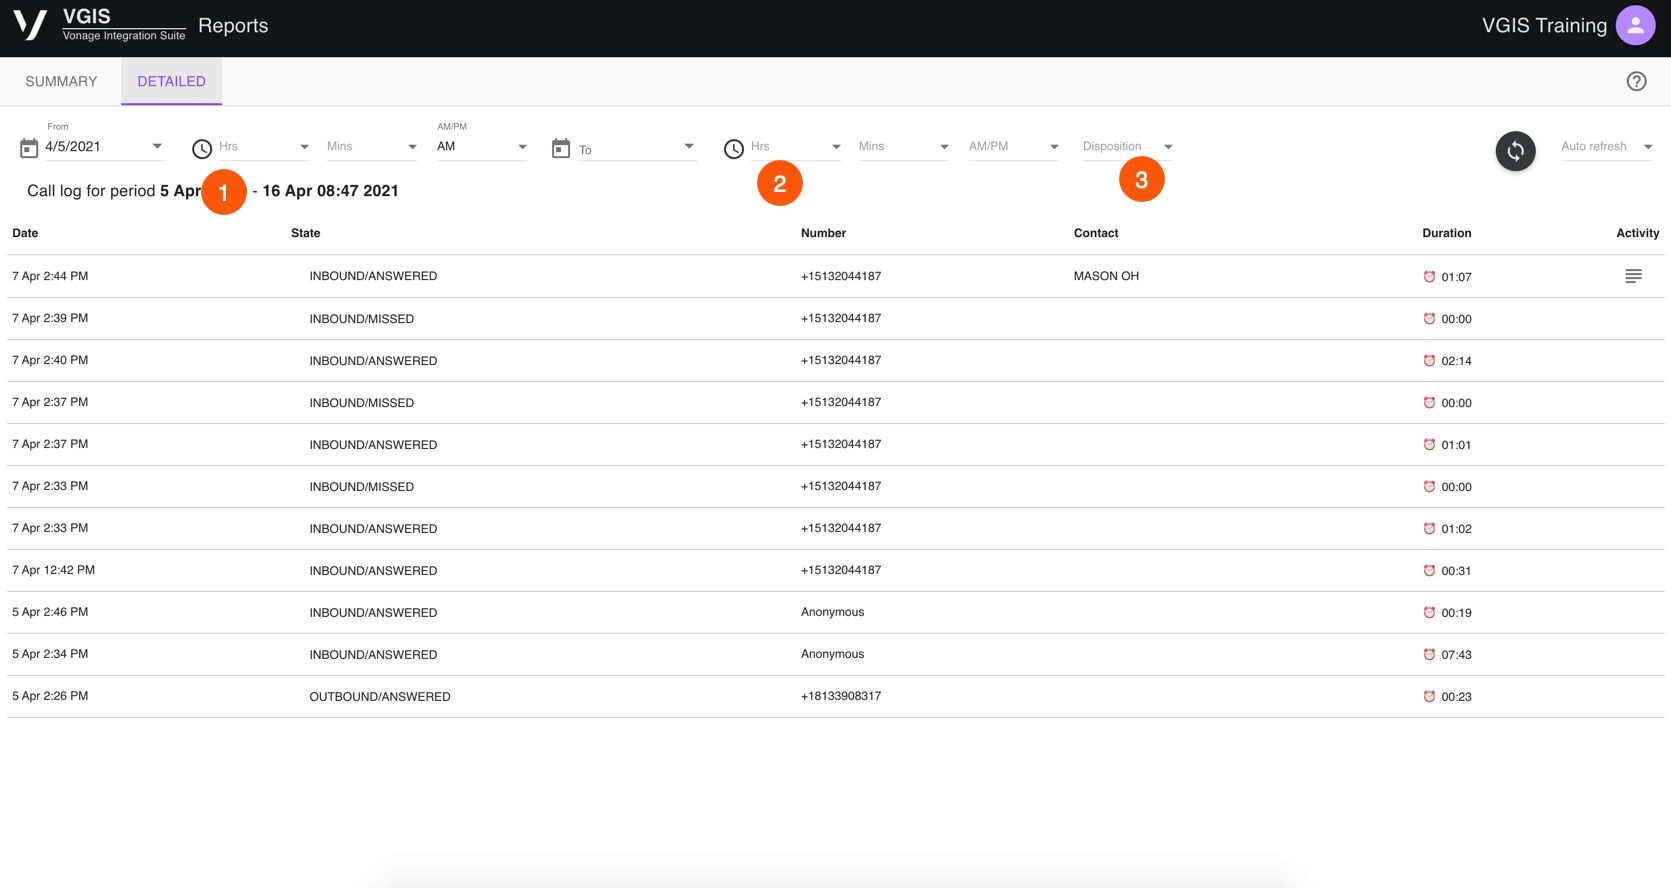
As you enter the corresponding information, data will appear within the table. If you would like the data to refresh on its own, from the auto-refresh drop-down menu, select the time frame you wish it to renew.
Workflow Settings (Admin)
To update Workflow Settings, as an admin:
- Click on the V icon to open the application.
- Once the application has opened, click on the profile avatar in the upper right corner.
- This should generate a drop-down menu.
- Select Config Portal.
- Once the web portal appears, click on the My Account tab. From here:
- You can resend a user’s welcome email if they have misplaced it or deleted it by accident.
- To do this, from the My Account dashboard:
- Navigate to the Account Users table.
- Find the user you wish to resend their welcome email to and click on their name.
- Under the Configuration Tools column, you will see an option to Resend Welcome Email.

- Click on the envelope icon, a resend email dialog box will appear.
- Proceed to select the integrations for the user,
- Click Send.
- The user will now receive a new welcome email
Manage Office 365 Integration Settings
To manage Office 365 User Integration settings:
- Proceed to click on the Office 365 button, a dialog box will appear with the following:
- Call Auto Activity Settings – this option will log calls to Office 365 from the Vonage Application depending on the settings you have excluded by clicking on the following:
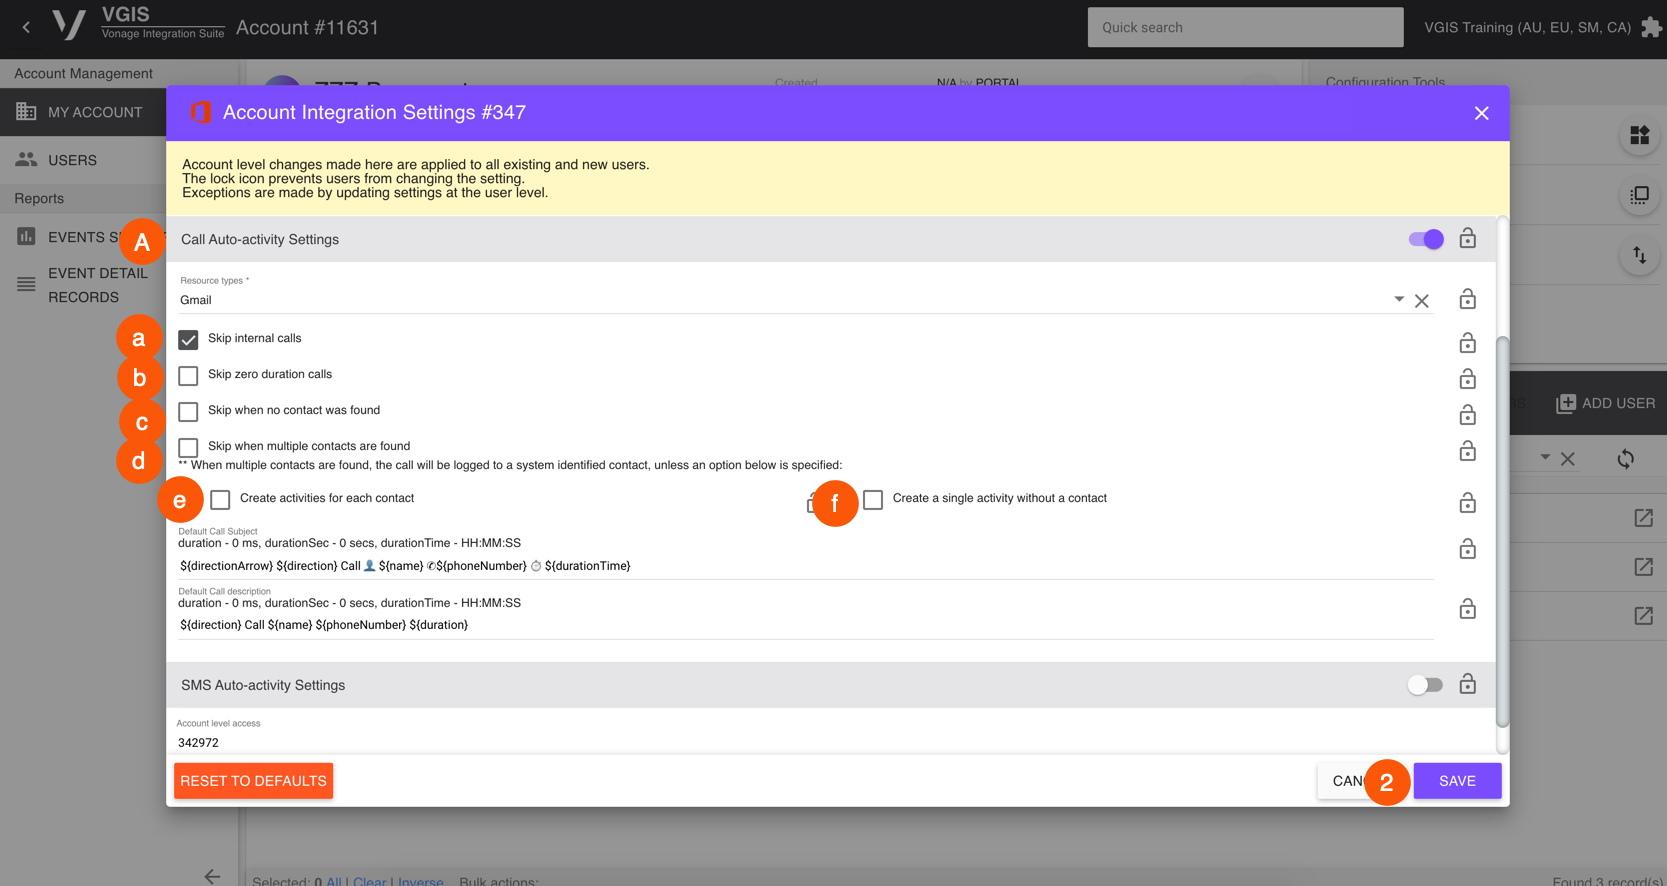
- Skip internal calls
- Skip zero duration calls
- Skip when no contact was found
- Skip when multiple contacts are found
When multiple contacts are found, the call will be logged to a system identified contact unless an option below is specified:
- Create activities for each contact
- Create a single activity without a contact
- SMS Auto Activity Settings – this option will log SMS texts to Office 365 from the Vonage Application depending on the settings you have excluded by clicking on the following:
- Skip internal SMS
- Skip when no contact was found
- Skip when multiple contacts are found
When multiple contacts are found, the SMS will be logged to a random contact unless an option below is specified:
- Create activities for each contact
- Create a single activity without a contact
- When complete, click Save.
- By default, the following fields will appear for a new contact or lead input:
- Name
- Phone Number
- Type
- When complete, click on the Create button to save. The new contact will immediately be added to Office 365..
- Clicking on the Home icon.
- Make sure it is the contact you wish to use.
- Then, click on the Event tab in the Activity box. A dialog box will appear.
- If the application recognizes the phone number, the name will display the Call Log window.
- In instances where there are various matches to the telephone number, the drop-down menu allows you to make the appropriate contract selection before saving the note to the application.
- Title – This will be automatically filled out if the contact is recognized. If not, you may have to enter the information manually.
- Start Time – This will be the start of the event. Use the drop-down menu to select the appropriate date and the arrows to select the appropriate time when highlighted.
- End Time – This will be the end of the event. Use the drop-down menu to select the appropriate date and the arrows to select the appropriate time when highlighted.
- Add Guests – This field allows you to add additional guests to this event via email address.
- Description – This field allows you to give a detailed description of the event, allowing you to provide any information the guest may need to view before the meeting.
- Once finished, click Create, your event will now be saved for this contact and shown in Office 365 calendar.

Adding a Contact
On the Office 365 tab, click home. Under create contacts, click the add contact button:
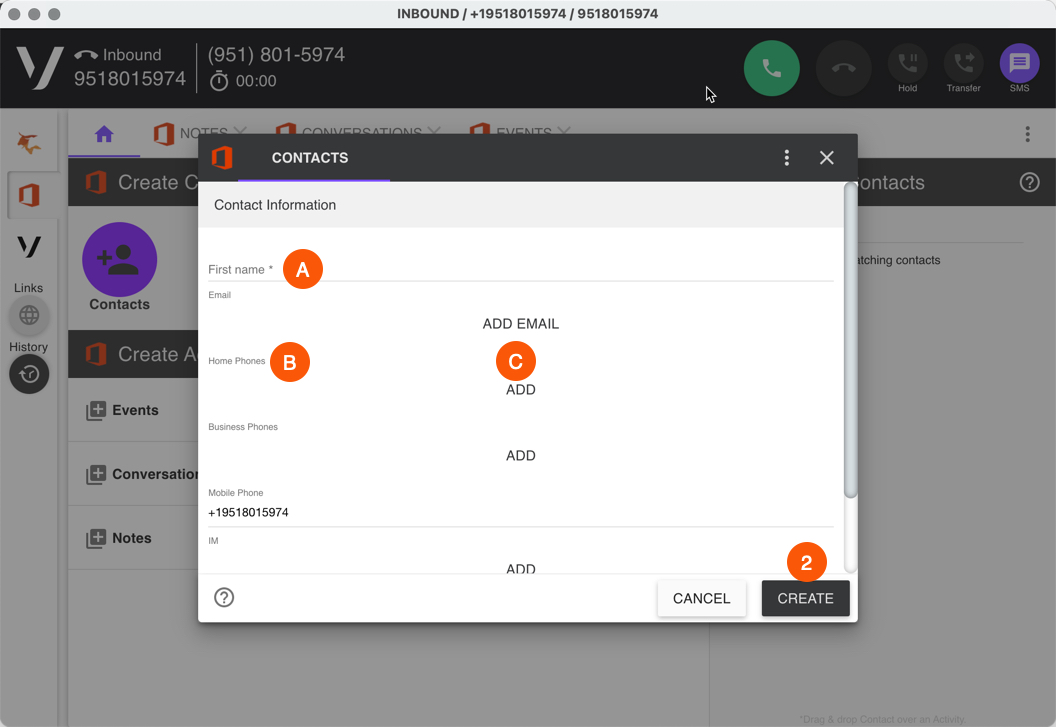
Please Note: The Name field is a mandatory field within the Adding a Contact window. There are additional fields such as emails, events, and websites that you are able to input user information.
Please Note: When creating or editing contacts directly within the application but outside the Call Log window, it is important to know that proper synchronization may take 12 to 24 hours.
Adding Activities
You can Send Emails or add Events or Tasks via the Home icon in the Contacts Dialog box. These items are known as Activities and are a highly effective way to keep updated information on contacts. For this tutorial, we will be adding an Event to this contact.

Once the window appears, you have the following fields.
