

Accessing the Admin Portal
To access the admin portal:
- From your web browser, input the following URL: admin.vonage.com.
- The login screen will appear.
- Proceed to input your Username and Password into the corresponding fields.
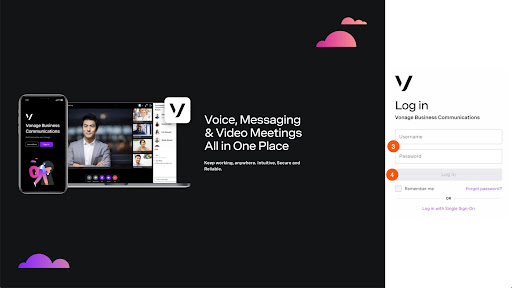
- Once complete, click Log In.
You can also access the admin portal from the desktop application (if applicable), click the Admin tab on the left-hand navigation menu within the app.

Phone System
Account Summary
The account summary page displays all of your company’s current extensions. The information presented in a table that can be sorted by clicking on the column headers:

You may edit the properties to any extension by clicking on the extension itself. Once clicked:
- The Edit Extension screen appears. Depending on the Extension type you click, the editable fields may vary.
- When you are satisfied with your changes, click on the Save button.

- A green confirmation box will appear.

- Lastly, click Close to move back to the Account Summary Screen.
Users
The user’s page displays all the users within your company profile. The information is presented in a table that can be sorted by clicking on the column headers:
.png)
To add a new user:
- Click the Add New button.
- An Add User window will appear. Proceed to fill out the Basic Info section; this section includes fields for the user’s name, username, and email.
Please Note: If you are out of seats, you will incur an additional change for each additional seat you add.
- Proceed to select the user type.
- For additional information on the corresponding user types, please click on the question mark here. You will see a list of the current user types and their meaning.

- After the user type is selected, you will also give the user permissions on this account. For each item you want to include, click on the checkbox associated with each option.
Lastly, you have the option to assign this user an extension, if you have one readily available:
- Click the Assign an Available extension. If you need to purchase an extension, select the purchase new extension option. If the user doesn’t need an extension, select the user who does not require an extension option.
- Click Save, when complete. You will automatically be back to the Users page.

You will notice that when you hover over a user’s information, you have additional action items. These items include:
- Delete – This allows you to delete the user permanently (unless they are another Administrator or ASU). To delete a user, click on the delete button, a confirmation box will appear, click OK to confirm your deletion.
- Reset Password – This will reset the password for that user. To reset a password, click on the reset password button, a confirmation box will appear, click OK to confirm your password reset.
- Edit – This allows you to edit the user and the permissions you set forth (unless they are another Administrator or ASU).

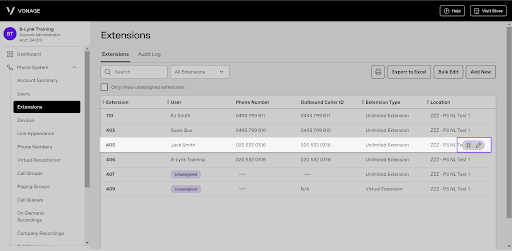
Extensions
The extension page displays all the extensions within your company. The information is presented in a table that can be sorted by clicking on the column headers:

To add a new extension:
- Click the Add New button. You will be brought to the extension store dashboard where you can choose the type of extension. You have the following options:
- Virtual extension – Good for remote employees. A Virtual Extension provides your employees with a dedicated direct dial number, which is forwarded to another number, like their mobile phone.
- Metered Extension – Commonly used for break room phones, conference room phones, and other phones that are not assigned to a permanent dedicated user.; a Metered Extension is essentially a "pay as you go" VoIP phone service.
- Unlimited extension – Suitable for your traditional office use.
- Mobile Unlimited Extension – Business phone service on your mobile device and desktop. Great for remote teams and any business that doesn’t need desk phones.

You will notice that when you hover over an extension, you are provided with an additional action item to edit the corresponding row. To edit, click here.
Devices
The devices page displays all the phones within your company, both assigned and unassigned. The information presented in a table that can be sorted by clicking on the column headers. You can also filter the table to show only unassigned devices or to include softphones by using the checkboxes located here.
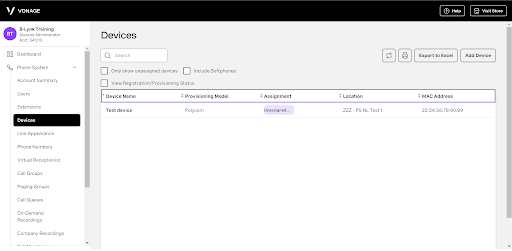
To add a new device:
- Click the Add Device button, an Add Device window will appear.
- Fill out the appropriate fields, paying close attention to Device Name, Make, Model, and MAC address.
- Once you finish, click the Save button. You will automatically be back to the Devices page.

Please Note: if you are trying to reassign a device from somewhere else, it needs to be unassigned first or moved from that user to the user you are trying to set up.
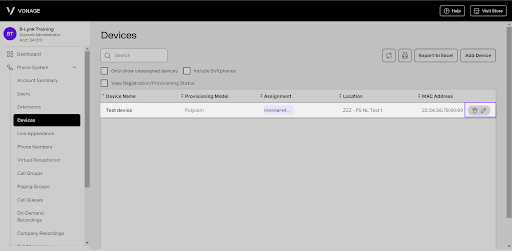
You will notice that when you hover over a device, you are provided with additional action items. These items include:
- Delete – This allows you to delete the device permanently. To remove a device, click on the delete button, a confirmation box will appear, click Yes to confirm your deletion.
- Edit – This allows you to edit the device and the permissions you set forth.
- Reset Password
- Unassign an extension – The device remains available for reassignment to another extension.
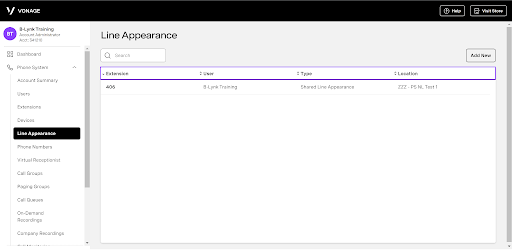
Line Appearance
The line appearance page displays all the line appearances within your company, either being Busy Lamp Field or Shared Line Appearance. The information is presented in a table that can be sorted by clicking on the column headers:
Please Note: Line Appearance is only available on physical devices. To see supported devices, click here.
To add a new line appearance:
- Click the Add New button, an Add Line Appearance window will appear.
- First, choose the extension you wish to use from the drop-down menu.
- Then set the line appearance you want to have from the following two options:
- Shared Line Appearance – This allows you to monitor other extensions and pick up or place calls from those extensions.
- Busy Lamp Field – this allows you to monitor the status of other extensions and set up speed dials to those extensions.
- You will then proceed to where the line appearance will be displayed, either the Base Unit and Expansion Module or just the Expansion Module.
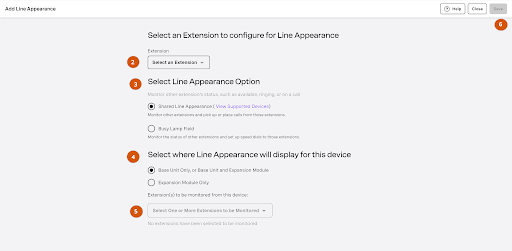
- Here you will also choose the extensions to be monitored from the drop-down menu.
- Once finished, click the Save button. You will automatically be directed back to the Line Appearance page.
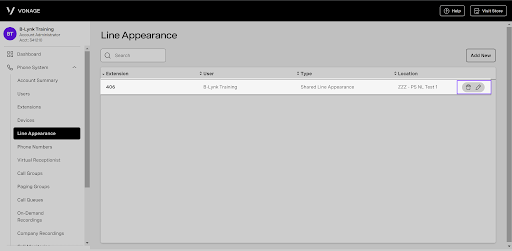
You will notice that when you hover over a line appearance, you are provided with additional action items. These items include:
- Delete – This removes the Shared Line Appearance or Busy Lamp Field setting on this extension.
- Edit – This allows you to edit the line permission settings.
Phone Numbers
The phone number page displays all the numbers within your company. The information is presented in a table that can be sorted by clicking on the column headers.

To add a new number:
- Click the Add New button. You will be given the option to Purchase New or Transfer an Existing number to Vonage.
- If you are purchasing a new number, you will be brought to the Add-On store dashboard where you can choose the type of number you want to have. You have the following options:

- International Company Number – International company number for business lets your customers in other countries call you without incurring any international charges
- Local Company Number – A Vonage Business Local or Geographic phone number enables you to use a phone number with a local area code so you can expand your presence in a specific geographic market.
- Smart Number – Smart Numbers enable customizable call workflows using your existing Vonage Business Communications numbers.
- Toll-Free Company Number – Toll-Free, or 1-800 number for business, allows your customers in the U.S. and Canada to call you without incurring any long distance charges.
If you choose Transfer an existing number, you will be redirected to the transfer request form. Follow the steps to initiate the transferring process.
You will notice that when you hover over a phone number, you are provided with additional action items. These items include:
- Remove from Use – This will unassign any extension or user from the phone number. The number remains available for reassignment to another extension.
- Change Caller ID
- Change Custom Tag – This allows you to add a custom tag to your Caller ID
- Update Call Continuity Service – This will enable you to provide an external number that calls will be forwarded to if the current system fails in any way.

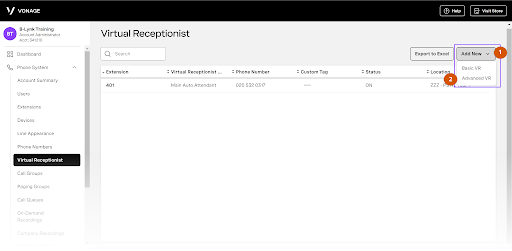
Virtual Receptionist
The Virtual Receptionist (VR), sometimes referred to as Auto Attendant, page displays all the virtual receptionists within your company. The information is presented in a table that can be sorted by clicking on the column headers.
To add a new virtual receptionist:
- Click the Add New button and choose whether you want to add a Basic VR or an Advanced VR. To further break these down:
- A Basic VR provides a simplified answering system that is not based on schedules.
- An Advanced VR lets you specify your business and non-business hours and enables you to do manual overrides to adjust for lunch hours, holidays and so forth.
- For this guide, we will be creating a Basic Virtual Receptionist. Once the Basic VR is clicked, a Create Virtual Receptionist window will appear.
- Proceed to enter the VR name in the field provided.
- Then enter your Extension Number in the field provided. The location should be set by default.
- Next, you will want to set the VR Number from the drop-down menu. You have the ability to select more than one number for this receptionist. One selected, click the Apply Number(s) button.
- Proceed to select whether or not this line rings the operator prior to going to the phone menu. You have the option to have the call go directly to the virtual receptionist or you can select an extension to ring first. If choosing an extension, you can set the ring duration before the call moves to the VR. When complete, click the next button.

- Then configure your options the caller will hear when connecting to the VR. For each option, you will select what will happen when the user selects that option. When complete, click the next button.

The final step is to record your greeting. In this step you will record the greeting callers will hear when they reach your virtual receptionist.
Step one is the Recording script preview.
These are the options you will record in Step 2.
- For the second step, you can either record the greeting from the portal. To do this:
- Press the record icon. A dialog box will appear. Follow the instructions to record a greeting via your desktop phone.
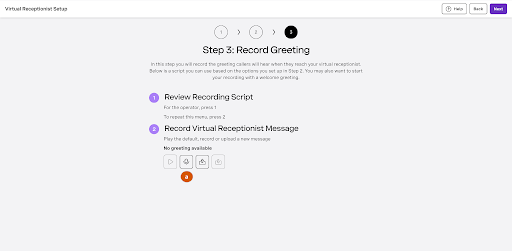
- Once satisfied with the greeting, click next to continue. Your Basic VR should now be set up.
or
- Also, you could upload a . WAV file. To upload a file:
- Click on the Upload button.
- Locate the file from your computer and click Open.
- The file will now be available.
- When finished, click Next, your Basic VR should be configured.
You will notice that when you hover over a virtual receptionist, you are provided with additional action items. These items include:

- Delete – This allows you to delete the receptionist permanently. To remove a receptionist, click on the delete button, a confirmation box will appear, click Yes to confirm your deletion.
- Manual Override – You can manually override your receptionist by clicking the Manual override button; this will bring you directly to the Manual Override section of the Add VR window. This feature might be useful for instance if your company has to close unexpectedly for severe weather. Follow these steps:
- Check the Enable Manual Override checkbox.
- Set the Date and time in which this override ends
- Then, select a different virtual receptionist to use or the extension to ring to catch a live person.
or
- Choose to play a custom message you upload by clicking the upload button and following the predefined steps or press the microphone icon to record a new greeting.
- When complete, click the Save button. You will be back to the Virtual Receptionist page.
- Duplicate – This allows you to duplicate the device and the permissions you set forth.
- Edit – This allows you to edit the device and the permissions you set forth.
Call Group
The call group page displays all the groups within your company. Call queues will not be listed here. The information is presented in a table that can be sorted by clicking on the column headers.

To add a new Call Group:
- Click Add New, this will take you to the add-on store where it will automatically be placed in your cart. Complete the checkout process and return the Call Group Page. Your newly bought feature will be added to the table.

You will notice that when you hover over a Call Group, you are provided with additional action items. These items include:
- Edit – This allows you to edit the call groups’ basic settings and voicemail. and the permissions you set forth.

To configure a new call group:
- Hover over the newly adding callgroup and click the edit icon. The call group window will appear.
- Select who you wish to assign to the group (up to 28 extensions).
- Assign the Call Group a Name and Location, if necessary.

- Select either “Blast (simultaneous) or A Sequential ring.
- Choose the number of rings before the next instruction is provided under the Voicemail tab on the left of the page.
- Direct Dial Numbers.
- Call Screening options are available for your Call Group.
Voicemail tab:
- Select one of four options to provide the next instruction if no one in your configured Call Group answers the phone:
- Use a Group Voicemail Box
- Use an Extension’s Voicemail
- Forward to another extension (this could be a Virtual Receptionist, other Call Group, Individual
- Play a greeting and disconnect

When finished, click the Save button if you made changes, if not, please click Close.
Call Queues
The call queues page displays all the queues within your company. The live call queue can also be viewed in the Call Dashboard in the Vonage desktop application. The information presented in a table that can be sorted by clicking on the column headers.
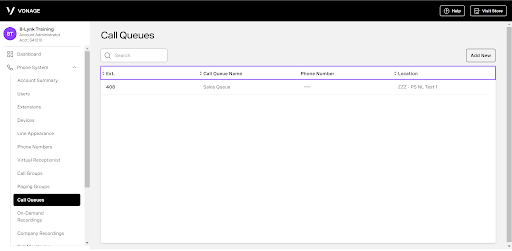
To add a new Call Queue:
- Click Add New, this will take you to the add-on store where it will automatically be placed in your cart. Complete the checkout process and return the Call Queue Page, your newly bought feature will be added to the table.

You will notice that when you hover over a Call Queue, you are provided with additional action items. These items include:
- View Status – This allows you to view the status of the queue once clicked. To see the status, click on the View Status icon. You will see a Call Queue Statistics page appear, displaying the following: Queue Agents, Callers Waiting, and Callers Connected.
- Edit – This allows you to edit the call queues, basic settings, agents assigned, hold music, and prompts.
- Click on Edit. Proceed to assign it a new extension and name. For this Tutorial, we will assign it extension 646 and name it Sales.
- Next, configure the following under the Basic Settings tab:
- Location – This is set by default when your account was created
- Direct Dial Numbers – This enables an extension to receive incoming calls from outside your company. Once established, you will see the Agent Login code which an agent uses to sign in and out of the queue
- Pause Between Calls – Also known as Wrap Up Time
- Name Greeting – This enables you to record or upload a name that callers will hear when reaching this extension. To record a greeting, click the record icon here. You can play the recording when complete. To upload a greeting, click the upload button and follow your system’s prompts with locating the file.
- Voicemail Options
- Delete Voicemail after sending email
- Play automated Voicemail Prompt – Allows you to use the default system greeting instead of a custom recorded message for Unavailable and Busy greetings.
- Set Voicemail Pin
- Send Voicemail to Email – You can enter a valid email address to receive voicemail attachments and then mark the option for Send Voicemail to Email to enable this feature.
- Voicemail Greeting – You can record a custom voicemail greeting to play when you are away from the office.
- Call Opt-Out Handling – Callers can press any number on their dial pad to opt-out. You can forward the caller to an extension, call group, call queue, virtual receptionists, or the queues voicemail box.. When selected, from the drop down menu, select the appropriate extension.
- Enable Call Announce – Hear the username/call tag being called after the call connects. For example: "You have a call for Sales."
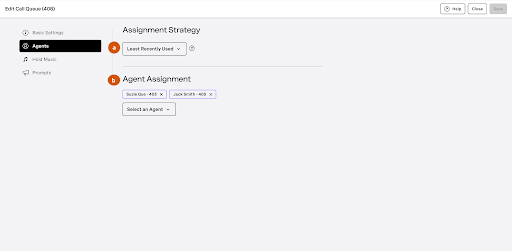
- Under the Agent tab, proceed to configure the following:
- Assignment Strategy
- Random – Calls are assigned in any order
- In order of Agent Tier – Call is assigned based on tiers, which can be assigned after selecting this option.
- From the Tier 1 drop-down menu, add the extensions you wish to include in that tier. You add an extension by clicking on the checkbox to the left.
- To add another Tier, select Add Tier and follow the previous steps. When complete click the save button.
- Least Recently Used – Agents who are idle the longest receive the next call.
- Ring All Agents
- Assign Agents
- Hold Music: If a caller is placed on hold, this is the music that will be heard. You can upload new audio files by clicking Upload Audio File and follow the onscreen instructions. Please Note: Each WAV or MP3 file can be a maximum of 8MB.
- Prompts: These play at specific points during hold music.
- Options When No Agent Is Signed In include:
- Forward all Calls to a Single Extension
- Play greeting and go to Voicemail
- Play a Greeting and Repeat Continuously: This will play a greeting continuously with the option for the caller to dial an extension if an option is selected.
- Play Greeting Once and then Disconnect: This will play a greeting once with the option for the caller to dial an extension and then hang up.
- When finished, click the Save button to confirm your changes.
- Click Add New, this will take you to the add-on store where it will automatically be placed in your cart. Complete the checkout process and return the On-Demand Recording Page, your newly bought feature will be added to the table.
- Enter the Recording Name.
- Select whether its either one of the following calls:
- All Calls
- Inbound Calls
- Outbound Calls
- Internal Calls
- Next, proceed to enter the time frame in which you would like to search.
- Enter the length in minutes and seconds.
- When finished, click Search.
- Step 1: Please enter the name of the rule, the call direction you want to record, these including all, inbound or outbound, and the percentage of calls you want to record from the drop-down menu. Within the rule name, only letters, numbers, underscores, and hyphens are allowed.
- Click Next
- Step 2: Please select the Extensions and Phone Numbers To record, those being all PBX Devices or specific numbers. If you choose specific numbers, proceed to enter the numbers from which you want to record. Next, select the From party and call length, those being all PBX Devices or specific numbers. If you choose specific numbers, proceed to enter the numbers from which you want to record. Lastly, select the call length Entire Call or First 2 minutes.
Please Note: If you have chosen All Activity in Step 1, you will only see captions for All PBX Devices and Specific Numbers and Extensions.
- Click Next
- Step 3: Select a legal disclaimer of the following:
- No Disclaimer
- Audible Beep every 15 Seconds
- Play disclaimer message before the call
- Click Next
- Step 4: Please Select a recording rule start date and end date and the days of the week to record.
- When complete, click Finish. You will return to the Recording Rules screen.
- Delete – This allows you to delete the recording permanently. To delete a record, click on the delete button, a confirmation box will appear, click OK to confirm your deletion.
- Download – This will allow you to download the call recording.
- Share – This allows you to email a recording to a recipient.
- View – This allows you to listen to a recording with detailed information accounted for and to add notes to the recording.
- View Status – This allows you to view the call monitored and who the call was monitored by.
- Edit – This allows you to edit the user’s call monitoring settings.
- Click on the edit icon corresponding to the extension you wish to edit.
- The Edit Call Monitoring – Extension ## screen will appear.
- You have the ability to change the PIN here.
- Next you can select whether or not to play a legal disclaimer.
- Lastly, you can choose the extensions they have the ability to monitor. From the Drop down menu, choose the appropriate extensions you like to monitor.
- When complete, click on the Save button.
- To monitor a call dial *105 on your Vonage phone and enter your PIN
- Block Outbound International Calls – For all extensions or select specific extension
- Block Calls from Callers without Caller ID
- Click on Add Rule at the top-right of the table.
- Proceed to enter the Rule or Number into the field, this will show up in the table for easy identification.
- Select the type of Call Blocking, either Blocked, meaning calls will not come through, or Exempt, meaning that this number will still reach its destination even if a rule is set to block it.
- Next, select the call type, either inbound or outbound.
- Lastly, select whether it applies to All Extensions or Specific Extensions. If choosing the latter, please select the extension to include.
- When completed, click Save. This Rule will now appear in the table.
- Click Add Location.
- When the Add Location dialog box appears, enter all the necessary information regarding the location of the device you wish to register. After filling out the Country, Location Type and State, make sure you assign this location to the device from the drop-down menu.
- When finished, click Save to confirm your information.
- Admins can prevent users from adding or editing their own phone devices to limit misconfigurations.
- Prevent call center agents from forwarding their calls to another number which may disrupt the flow of call queues.
- Limit the number of users who may only access the Call Dashboard to those who need it.
- Limit which types of users can view and access parked calls.
- Click on Permissions. This will bring you to the settings you can edit per user.
- Expand the Desktop and Mobile sections.
- To edit these new permissions, click on the Bulk Edit Link.
- You will see check boxes in which you can use to either allow or disallow a user to manipulate the setting at hand. When complete, click Save. The User Permissions will now be saved.
- The call dashboard can only be found on the desktop app (not via mobile apps).
- Users must have Call Dashboard permission to enable Visual Call Park.
- Device settings can only be found in the desktop app (not via mobile apps).
- Enable Single Sign-On for this account and enter the following information from the Identity provider.:
- Entity ID URL
- Sign In Page URL
- Sign Out Page URL
- Click Upload Certificate and attach the Verification Certificate for your IDP. Please Note:: The certificate file must be an X.509 formatted certificate with an embedded public key.
- Click Save.
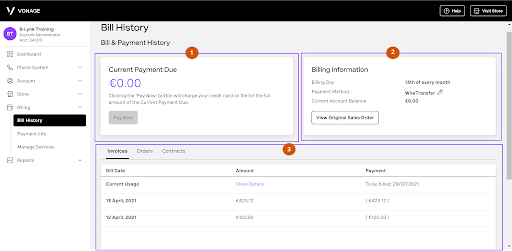
- Current Payment Due – In this area, you can find the amount that is currently due and apply for payment if you wish by clicking the Pay Now button. Please Note: Clicking the Pay Now button will charge your credit card on file for the full amount of the Current Payment Due.
- Billing Information – This is where you can find your Due Date, your Payment Method and the current balance on your account.
- Invoice and Orders – This table houses all your past and current invoices when the invoice tab is selected and your order history when the order tab is clicked.
- Click on the Add Payment Method.
- On the following screen enter the Card Holder Name, followed by the Card Holder Number.
- Proceed to enter the expiration date and security (CVV) number along the back of the card. Then, enter your billing address.
- When finished, click on the Add Card button. Your card will now show in the payment table.
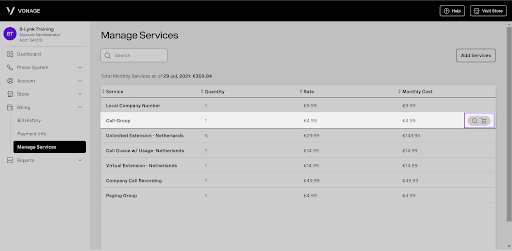
- Hover over the service.
- Click on the magnifying glass icon.
- A new page will appear with its corresponding details.
- Saved Reports – This page houses all of your saved reports. Once a saved report has been created, you can click the “Subscribe” icon to receive the report via email at 12:00PM ET on the day following the end date in the report.
- My Calls – This report shows statistics of your calls. You can either set a custom time period or select either today, yesterday, last week, this month or last month. If selecting a custom time period, make sure to set the start time and day as well as the end time and day on the custom date and time dialog box. make sure to click Apply before closing that window.

- Company Summary – This report shows statistics of the calls made by your company. You can either set a custom time period or select either today, yesterday, last week, this month or last month. If selecting a custom time period, make sure to set the start time and day as well as the end time and day on the custom date and time dialog box. make sure to click Apply before closing that window.

- Users – This report shows statistics of calls by each individual user. You can see a quick stats table here as well as the main info table that breaks these calls down by the user. You can either set a custom time period or select either today, yesterday, last week, this month or last month. If selecting a custom time period, make sure to set the start time and day as well as the end time and day on the custom date and time dialog box. make sure to click Apply before closing that window.

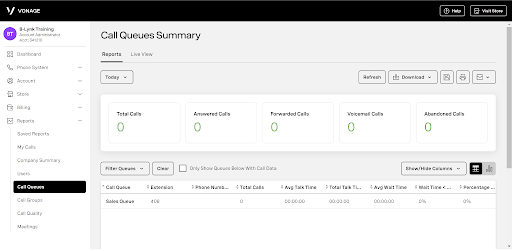
- Call Queues – This report shows statistics of your calls by the Calls Queues you have set up. You can either view generated reports here, or a live view here. For a generated report, you can either set a custom time period or select either today, yesterday, last week, this month or last month. If selecting a custom time period, make sure to set the start time and day as well as the end time and day on the custom date and time dialog box. make sure to click Apply before closing that window.
- Call Groups – This report shows statistics of your calls by the Calls Groups you have set up. You can either set a custom time period or select either today, yesterday, last week, this month or last month. If selecting a custom time period, make sure to set the start time and day as well as the end time and day on the custom date and time dialog box. make sure to click Apply before closing that window.

- Call Quality – This report shows statistics of calls based on quality in voice and sound. You can see a quick stats table here as well as the main info table that breaks these calls down by the user. You can either set a custom time period or select either today, yesterday, last week, this month or last month. If selecting a custom time period, make sure to set the start time and day as well as the end time and day on the custom date and time dialog box. Make sure to click Apply before closing that window.

Please Note: The MOS or Mean Opinion Score is an indicator of call quality. A score of 3.5 to 4.2 is typical for VoIP calls.
- Meetings- The Meetings Summary report displays information for various meetings, including:
- Total number of meetings
- Total meetings duration
- Average meetings duration
- Average number of participants.

To configure the new Call Queue:


On-Demand Recordings
The on-demand recordings page displays all the on-demand recordings within your company. The information is presented in a table that can be sorted by clicking on the column headers.
Please Note: This feature may not be available for your location.

To add a new On-Demand Recording:

Please Note: To begin recording, enter *7. To stop the recording, enter *8.
You can also filter your recording by clicking on the magnifying glass icon. The search recording dialog box will appear. Enter the information as needed:

Company Call Recordings
The company call recordings page displays all the company recordings within your company. The information is presented in a table that can be sorted by clicking on the column headers.

If you wish to record certain calls, you can create a rule as seen here in the details column. to create a rule, click on Recording Rules and then proceed to click Add Rule.
From the Recordings screen, You will notice that when you hover over a recording, you are provided with additional action items. These items include:

Call Monitoring
The call monitoring page displays all the monitored users within your company. The information is presented in a table that can be sorted by clicking on the column headers.
Please Note: This feature may not be available for your location.

You will notice that when you hover over a Call Monitoring user, you are provided with additional action items. These items include:

To edit a monitored call:

Please Note: There are both federal and state laws governing call recording and call monitoring. You should consult your own legal counsel for advice as to whether you are permitted to record your company’s telephone calls, and if so, what notification you are required to include on the call and what consent you must obtain.
Call Blocking
You can set up rules to block both inbound and outbound calls. The rules for Call Blocking also refer to faxes. The call blocking page is set up into two sections, Creating Rules and the information table which houses all of your call block information. You can Set Call Blocking Quick Rules for the following:

After selecting these quick rules, click Save to confirm your selections.
You can also create Call Blocking Rules that are independent of the above. To create a rule:


Account Details
Company Contact
The Company Contact page houses your company’s address and contact information. This information can be updated as needed. If you have made updates, please click the Save button before moving to a different page.

Emergency Services Locations e911 Locations
The e911 location defines the physical address of every phone on your account. This ensures that emergency responders are sent to the appropriate location when you make a 911 call from your Vonage service.
Please Note: Please contact Vonage Customer Care to add or adjust e911 Information.
To add a new location to this list:

User Permissions
Under this tab, you will be able to locate the user types of your company, along with the permissions of each user type, allowing you to customize each user’s experience. This includes both desktop and mobile apps.
Under permissions, you can do the following:
To access the User Permissions page, from the admin dashboard, click on Account and proceed to select User Permissions. Along the top of the main table:

Please Note:
Desktop & Mobile computer or call forwarding authorization cannot be removed for user types who have access to the Admin Portal Extensions.
PBX Settings –
Under PBX Settings tab you can set up Default Time Zone, 7-digit dialing, select your hold music and set your outbound caller ID Number for this account.

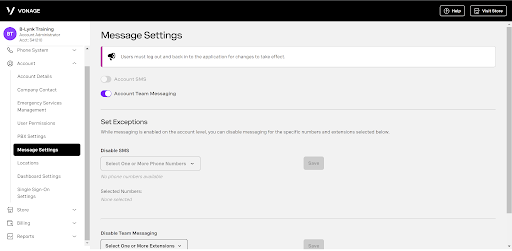
Messages Settings –
This is where you will configure your settings for messages. While messaging is enabled on the account level, you can disable messaging for the specific numbers and extensions selected below. To do this, select the numbers or extensions from the Disable SMS and Disable Team Messaging drop-down menus.
Locations –
This is used to set your primary location for your company. To edit this information, click on the edit icon. Edit the necessary information and then click Save when completed.

Dashboard Settings –
Allows you to control what the end user views on the dashboard. You can edit this information by clicking the edit icon for a corresponding user. You can proceed to edit their Dashboard Settings. Click save when complete.

Single Sign-On Settings –
Allows users to log in with a single user name and password to several systems. Single Sign-On support for VBC allows you to use a single username and password across other single sign-on enabled apps and VBC.

Billing
Bill History
Your billing history page can be broken into the following areas:
Payment Info
You can review and manage multiple payment methods on your account. As an administrator, you can have several credit cards on hand, but one card must be set as the default for payment of monthly invoices and one-time fees. A green checkmark is displayed on the default card.
To add a new payment method:

If you have a credit card on your file, hover over it and click the Pencil icon to edit the info.
If you have several credit cards in your account, hover over a non-default card for an additional option to either delete the payment method, set this payment method as default or edit the details of this payment method.
Please Note: There is a $5 fee if you contact Customer Care to change your payment method.
Manage Services
The manage services page houses all your current account services. Services that have the small pencil icon next to its name may be edited on this page. Once clicked, you can add or remove extensions that are associated with this service.
To see the details of a specific service:
Reports
The following reports can be viewed from the Admin Portal:

From here, you can refresh, download, save, print and email the Meeting Summary Reports.
