

System Settings (for Admins)
Home Tab
To access your system settings, from the VCC Admin Portal homepage, click the System Settings tab in the left-hand navigation. You can perform the following tasks within the System Settings area of the Admin Portal of the Vonage Contact Center (VCC):
- Changing a PIN – To change your PIN, from the home tab, find the Change PIN table. Select the phone number or user you would like to change the PIN for. The list contains the numbers available in your account. Next, input a new PIN number. When finished, click Update. A pin is needed if you would like to change your system’s routing remotely by calling a VCC “Useful telephone number.”
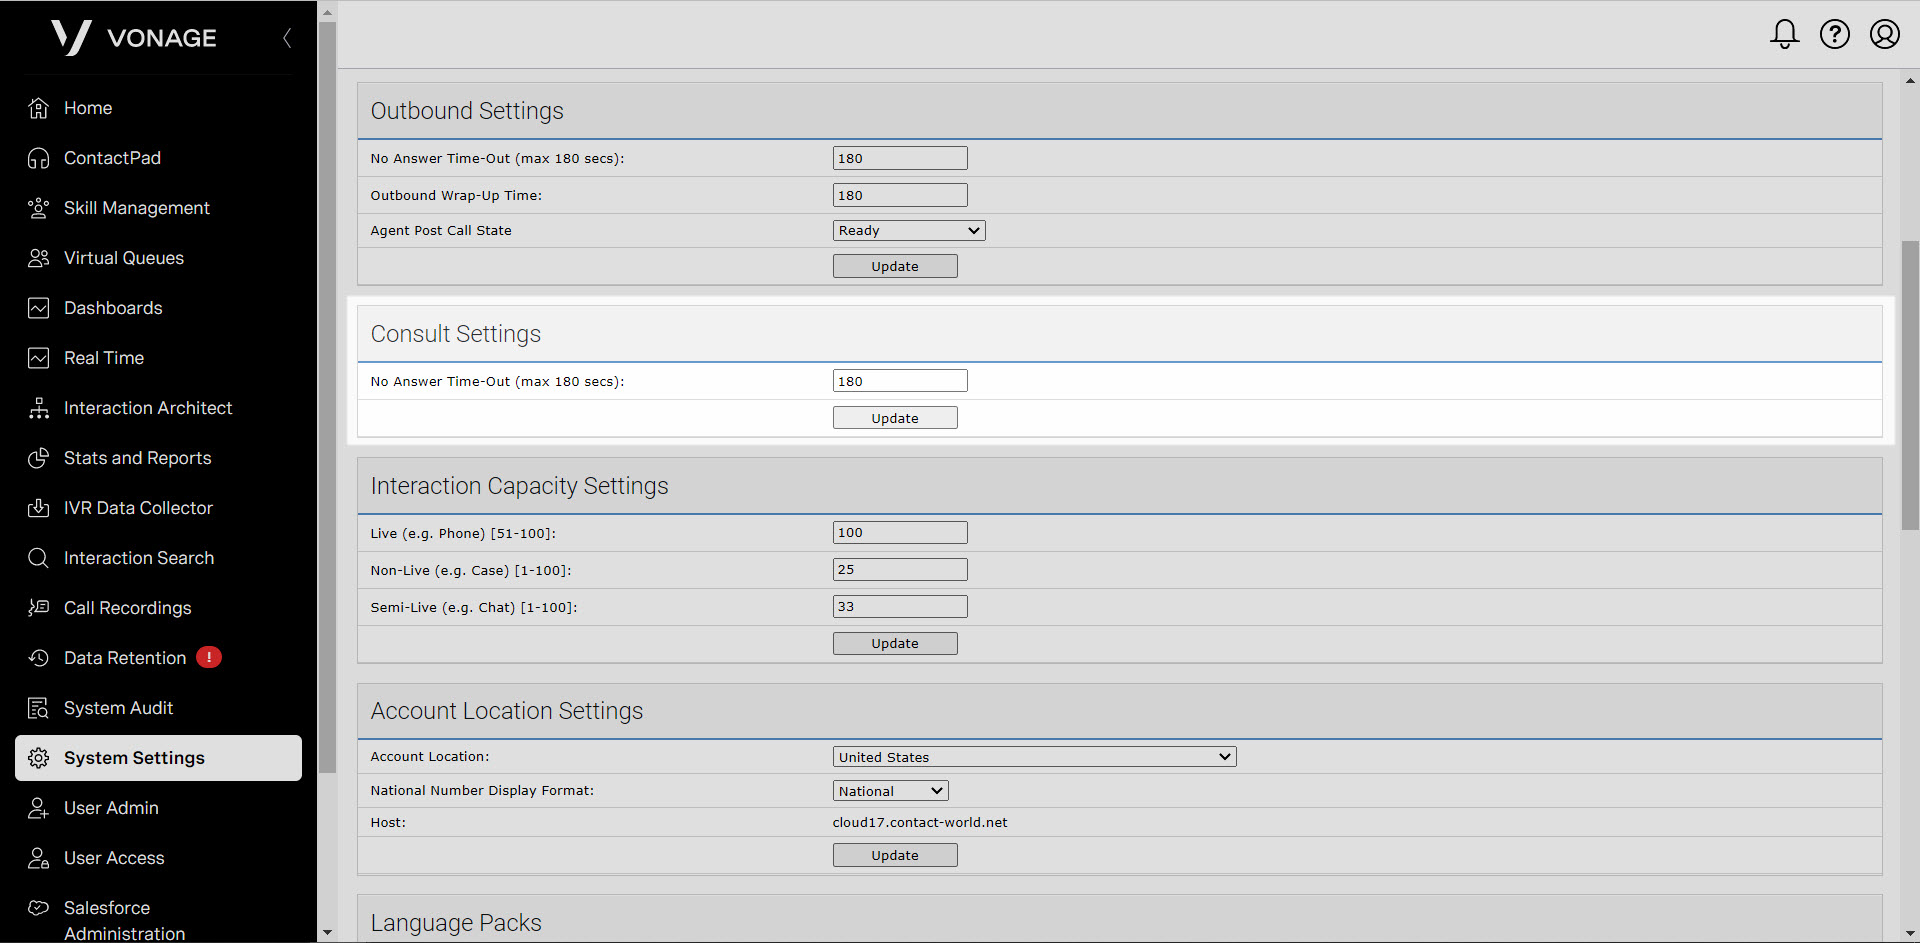
- Outbound Settings – To configure outbound settings, navigate to the appropriate table. You can configure the following settings:
- No Answer time Out: This specifies a time limit in which VCC tries to connect the agent’s outbound call. The standard value for this is 15 seconds but can be configured up to 180.
- Outbound Wrap-Up Time: This specifies a time limit for an agent to wrap up a call after the call has ended. The amount of time assigned here allows the agent to make any notes on the previous call account. The default time for this is 180 seconds, but can be changed to a higher limit.
- Agent Post Call State: After the agent leaves the Wrap Up (Auto) state at the end of a completed call, the agent goes into the state that you specify in Agent Post Call State. These can be Ready, Ready (Outbound), or Leave Unchanged. If choosing the latter option, the agent will move back into the state they were prior to the call.
- Consult Settings – To configure consult settings, navigate to the appropriate table. You can configure the following setting:
- No Answer Time-Out: When an agent clicks to consult with a third-party during a call, VCC attempts to connect the call to the specified agent or telephone number for the number of seconds you specify. The default setting is 45 seconds. The consult call times out after this time and an error message appears in the ContactPad. The allowed values vary from 5 seconds to 180 seconds
When finished, click Update to confirm your settings.
- Account Location Settings – To configure your account location settings, navigate to the appropriate table. You can configure the following settings:
- Account Location: This is the location where your current office is located.
- National Number Display Format: This is the format in which VCC displays phone numbers in ContactPad. You have the option to choose National Format, which is your generic 10-digit number, or an International Format which require the following:
- a + sign to indicate that the number is international
- a country code, such as 44
- a region code, such as 1234
- an extension number, such as 567890
- Host: This is where your account is held in the cloud. This value cannot be edited.
- API Authentication Token – To make use of the Vonage Contact Center APIs, and various other Vonage Contact Center features, you need to have your account key and API authentication token. To use the APIs, you must also get a bearer access token. To generate a new API Token, navigate to the appropriate table and click Generate new API Authentication token. A new token will generate.
- Callback Number – When an agent makes an outbound call, Vonage Contact Center presents a number to the person they are calling. This number is a callback number. To modify the callback numbers, following these steps:
- First download the template.
- Next, complete the spreadsheet.
- Then upload the spreadsheet by clicking Choose File. Locate the file you wish to upload and then click Open. When the upload is complete, finalize its upload, by clicking the Upload button.

When finished, click Update to confirm your changes.

When finished, click Update to confirm your settings.


Note: Outbound callback numbers may only be added by a Vonage Voice Provisioner
Passwords Tab
A login policy can be configured on the VCC Admin Portal. This policy determines the minimum strength of a password for a user. A strong password can enhance the security of your VCC Admin Portal and ContactPad systems.
To configure these settings, from the System Setting page, click on the Password tab. You can configure the following:
- Password Expiration Policy – This determines how often the user must change their password. Make sure the checkbox is checked to enable this option. Once this is done, enter the time in days in which a user must change their password after. The default time is 90 days.
- Password Complexity Requirements – This determines how a user generates their password. You can utilize these settings:
- Minimum length – The minimum number of characters in the password.
- Minimum lower case characters – The minimum number of lowercase letters in the password.
- Minimum upper case characters – The minimum number of uppercase letters in the password.
- Minimum digits – The minimum number of numeric characters in the password.
- Minimum special characters – The minimum number of special characters in the password. The default value is 0.
When you’re done making any modifications, click Update Policy to save your changes.

Single Sign-On Tab
To configure these settings, from the System Settings page, click on the Single Sign-On tab. In the Single Sign-On URLs section, the URLs that VCC Admin Portal supervisors and agents must use to access the single sign-on pages are displayed for the Vonage Contact Center portal and ContactPad. Click the icon alongside the field to copy the contents of the field to the Clipboard.
Note: These are the URLs you will use to log in to this application. We recommend that you bookmark these links for future use.

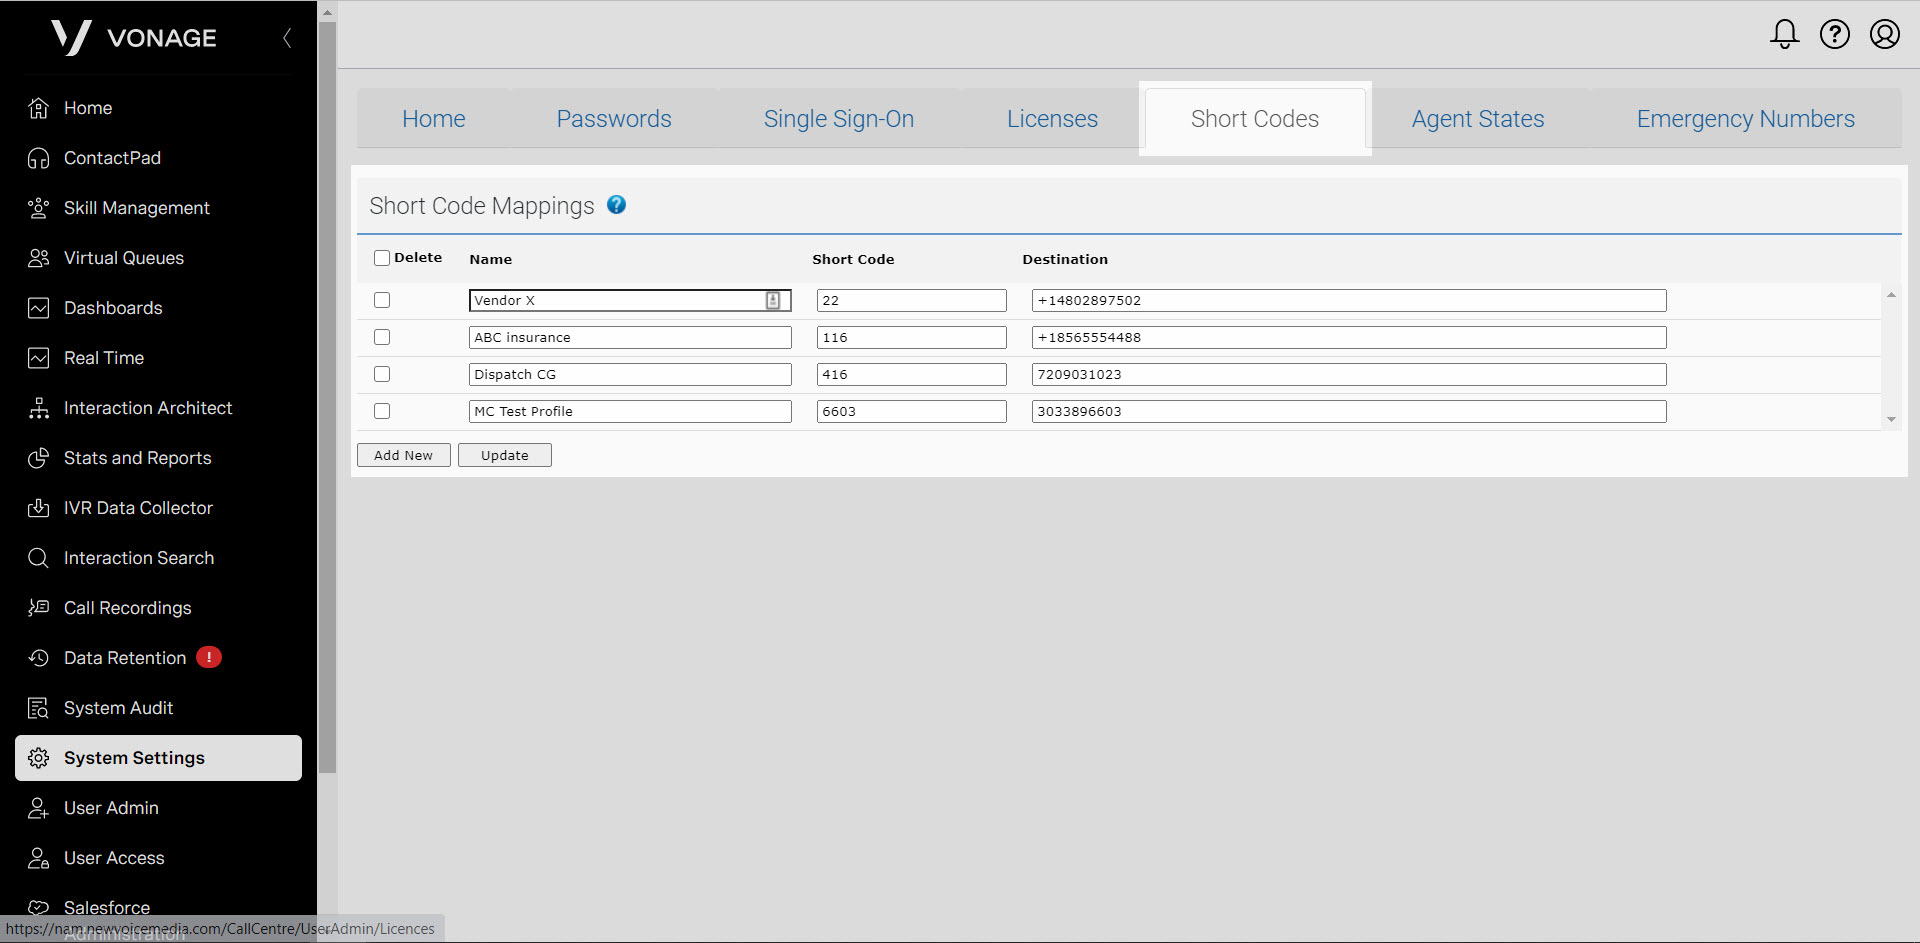
Short Codes Tab
A shortcode is a number mapped to a destination. An agent may use the ContactPad to dial a shortcode to make a call or pass an existing call to the destination.
To configure these settings, from the System Setting page, click the Short Codes tab. In the Short Code Mappings area, you may see some shortcodes already generated. To add a new shortcode, click the Add New button. Proceed to enter the information requested in the table including:
- Name – The name can contain alphanumeric characters as well as the following:
- Underscore (_)
- Braces (‘(‘ And ‘)’)
- Slash (/)
- Apostrophe (‘)
- Ampersand (&)
- Period (.)
- Plus Sign (+)
- Colon (:)
- Semicolon (;)
- Comma (,)
- Hyphen (-)
- Space ( )
- Short Code – This is the number the agent will dial to reach a certain destination.
- Destination – This is the number the shortcode will direct to.
When configured, click Update.
Agent States Tab
Agent states track an agent’s activity and make an agent available to take calls. To configure these settings, from the System Setting page, click the Agent States tab, then follow these steps:
- In the Select the Major state to set up list, click the major state that you are creating a new minor state for.
- Click Add. A new minor state appears on the list.
- To edit, click Edit button alongside the minor state.
- Change the name, this name will appear in the agent’s ContactPad, if required.
- Then select the Enabled checkbox to enable or disable the minor state.
- Click Save to save your changes.

Interaction Search
The Interaction Content Search area is divided into two sections: the search criteria section and the results table. In the search criteria section, you can enter the criteria to narrow your search. The section consists of three collapsible parts:
- Date range:
- Start – The start date and time for the interaction content search.
- End – The end date and time for the interaction content search.
- Interaction Details
- GUID – The unique identifier of an interaction. Enter a GUID if you are looking for a specific exchange.
- Agent ID – The identifier of an agent who handled the interaction.
- From/To – To get the interaction content for calls made to or from a specific Vonage Contact Center account, customer, or agent telephone number or numbers, type the first part or all of the number or numbers you want to include in the results.
- Call Direction
- Inbound and outbound – Select this radio button inbound and outbound if you want to search both for inbound and outbound interactions.
- Inbound only – Select this radio button if you want to search for inbound interactions only.
- Outbound only – Select this radio button if you want to search for outbound interactions only.
When complete, click on the Search button. The result will display on the right.
System Audit
Vonage Contact Center keeps track of the supervisor’s many tasks, such as logging into the VCC Admin Portal, creating a new agent, modifying an agent’s status, or creating a new Interaction Architect applet.
To view this activity, from the dashboard, click on System Audit. By default, all the tracked actions appear. Each action includes the following information:
- Date/Time – The date and time at which the user performed the action.
- Account – The Vonage Contact Center account to which the agent belongs.
- User – The name of the agent who performed the action.
- Action – The action performed.
- Data – Specific data relating to the action.
- System audit information is retained for the same length as your contracted length for retraining call recordings
You can page through the actions by clicking the Next Page and Previous Page links or simply searching for the activity using the search field.