

Introduction
Vonage Business Communications desktop application is a free desktop software that allows you to use and control your Vonage Business phone service from your personal computer. You can place and receive calls with the Desktop Application, send and receive text messages with Vonage Flow, show your customer contact history, control Call Forwarding Settings, and listen to voicemails.
How to Log into the Desktop Application Client:
To log into the Desktop Client:
- Open a browser and go to the following URL: https://app.vonage.com.
- When you are added to a Vonage Business Communications account as an End User, you will receive an email with a username and a link to set up your password.
For a Vonage Business Communications password to be successful, it must meet the following requirements:
- Must be different from any of the previous 5 passwords
- Contain between 8 and 50 characters
- Contain an uppercase character
- Contain a lower case character
- Contain a number (ex. 7)
- Contain a special character (ex. $)
- Once Complete, you will be logged into the Vonage Communications Desktop App.

Please Note: If you have already created your password and are returning to the portal, you need only to Enter your Username and Password and select Sign In.
Changing Your Profile Picture
- On the left side, click your avatar. By default, it will contain your initials.

To upload a picture of yourself, from the quick menu:
- Click on Settings.
- Your Profile settings page will appear.
- Scroll down to Profile Picture and click on your avatar.
- When the window appears, click on Upload and select the image you wish to use from your computer.
- When finished, click Open.
- Center your picture, then click Save.
- Your avatar will now be set with your picture.


How to Place Calls:
Upon sign-in, the Calls page will be the first page you see. The Calls page is broken into two distinctive areas, the first area being your Call Log window. Here, you can view all incoming and outgoing calls as well as missed calls. The second section of the call page houses all the caller information. This page will change depending on the caller you select and show all the available data for the said caller.

To place a call from the call page:
- Click on the New Call button. The dial pad window will appear.
- Enter a valid extension or 10-digit number.
- Click the Call button. The Call will now be placed and show at the top of the dashboard screen.

You can also place a call from your company’s directory, to do this:
- Click on the New Call button to make the dial pad window will appear.
- Proceed to click on the Directory icon here. The dial pad disappears and is replaced with your Contact list.
- You can either search for a contact with the search field or locate it manually from the list below.
- Once the contact is found, hover over their name and click on the blue phone icon to complete the call.
To end a call:
- Press the end button located here. This will stop the currently active call.

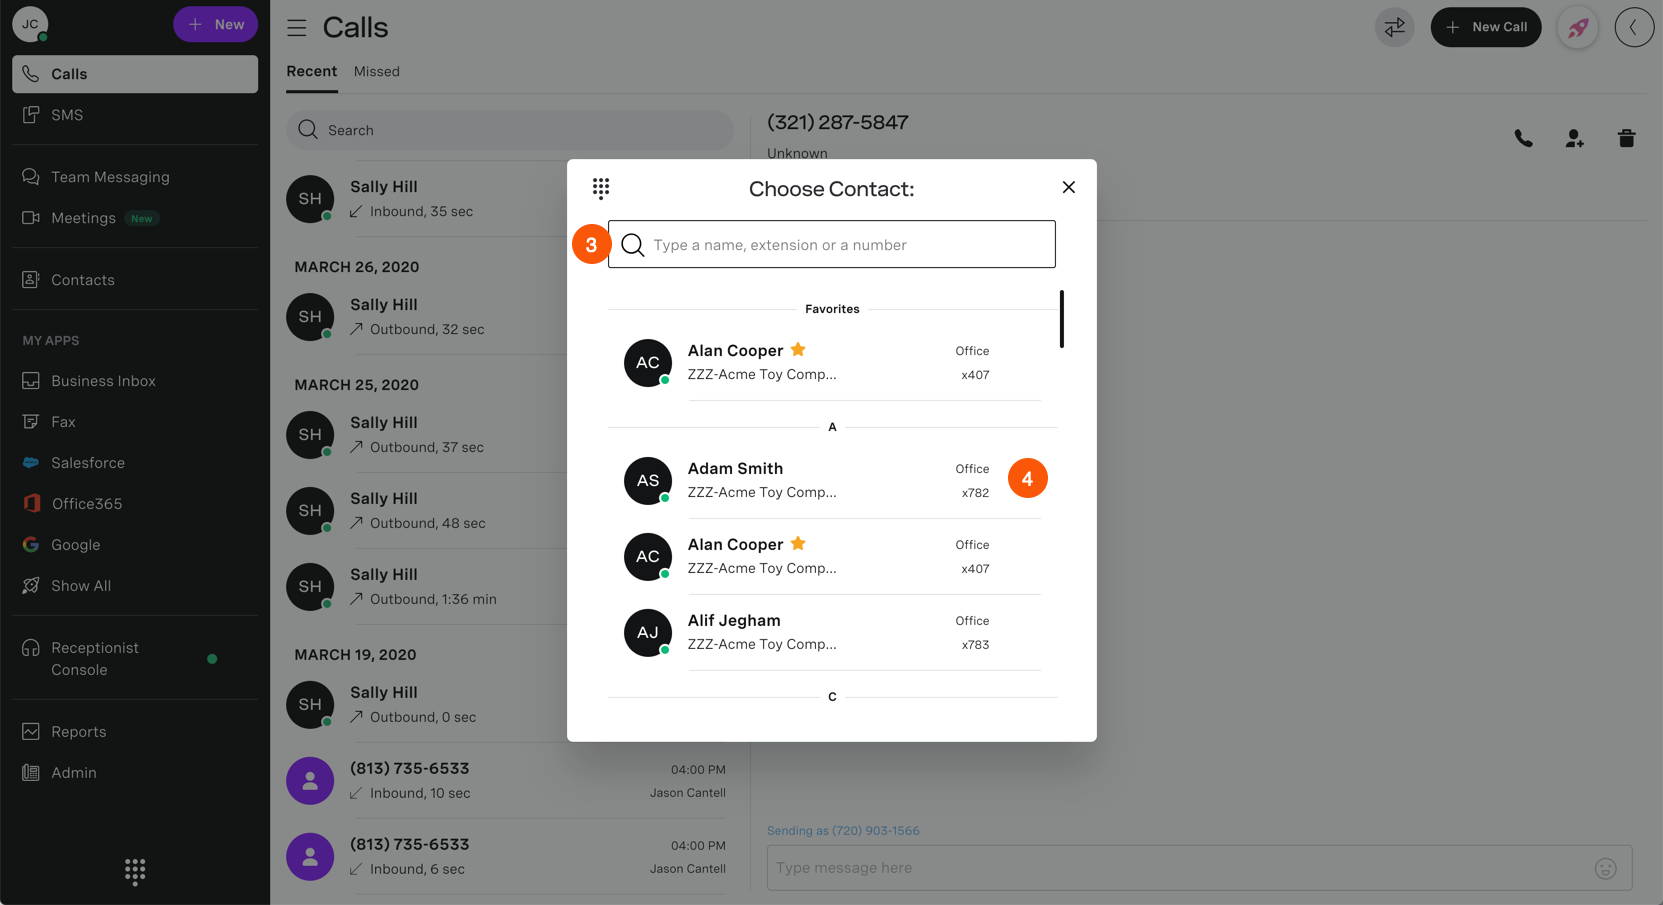
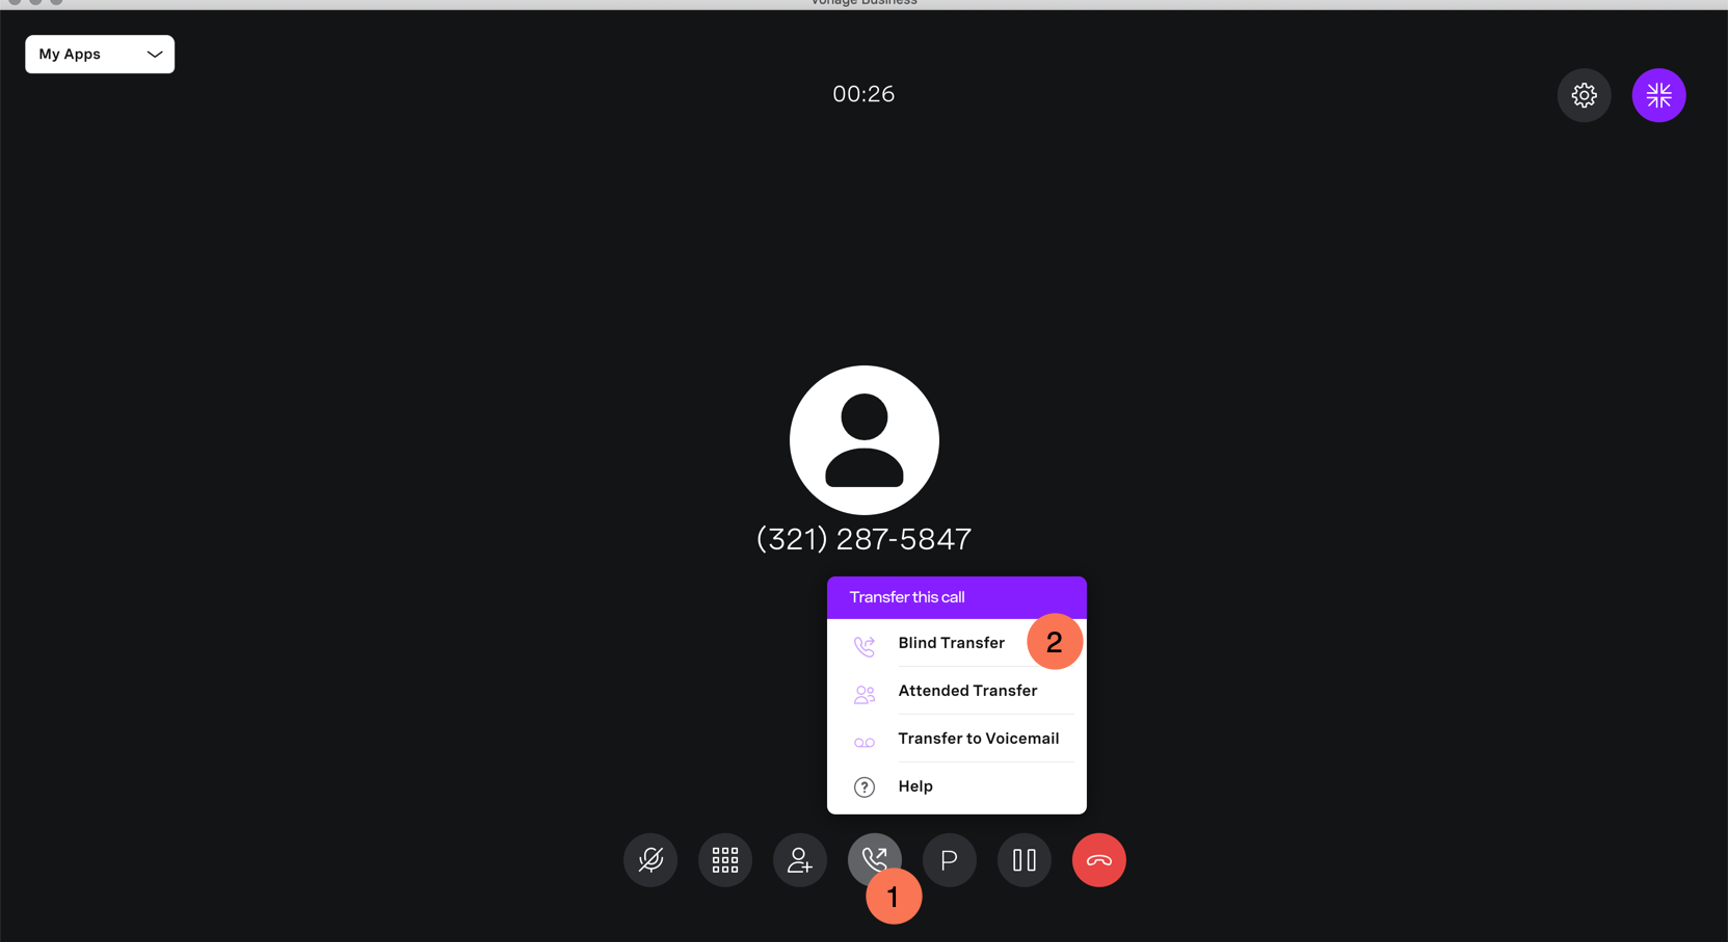
To transfer a call:
- A Blind (or unannounced) Transfer takes place when you transfer a call to someone else without announcing the call first. To conduct a blind transfer, while on an active call:
- Click the Transfer button.
- Proceed to select Blind Transfer.
- From the Contact panel, select the recipient you wish to transfer to.
- Click the Transfer button. Your call will now be transferred.

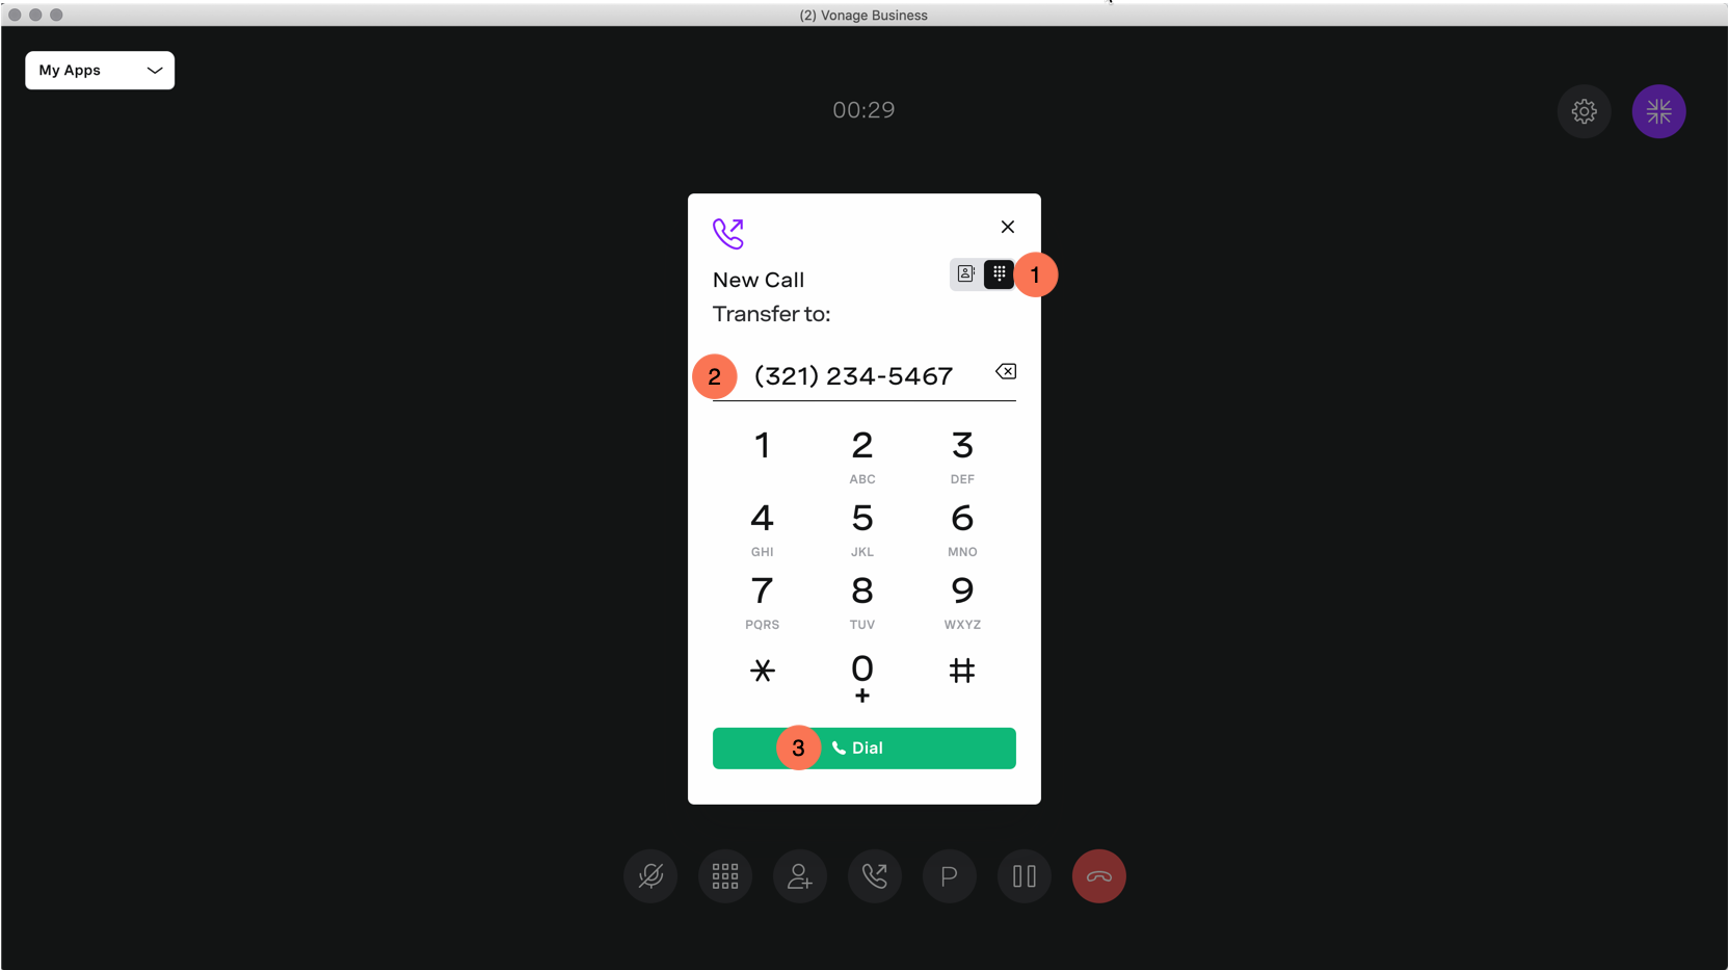
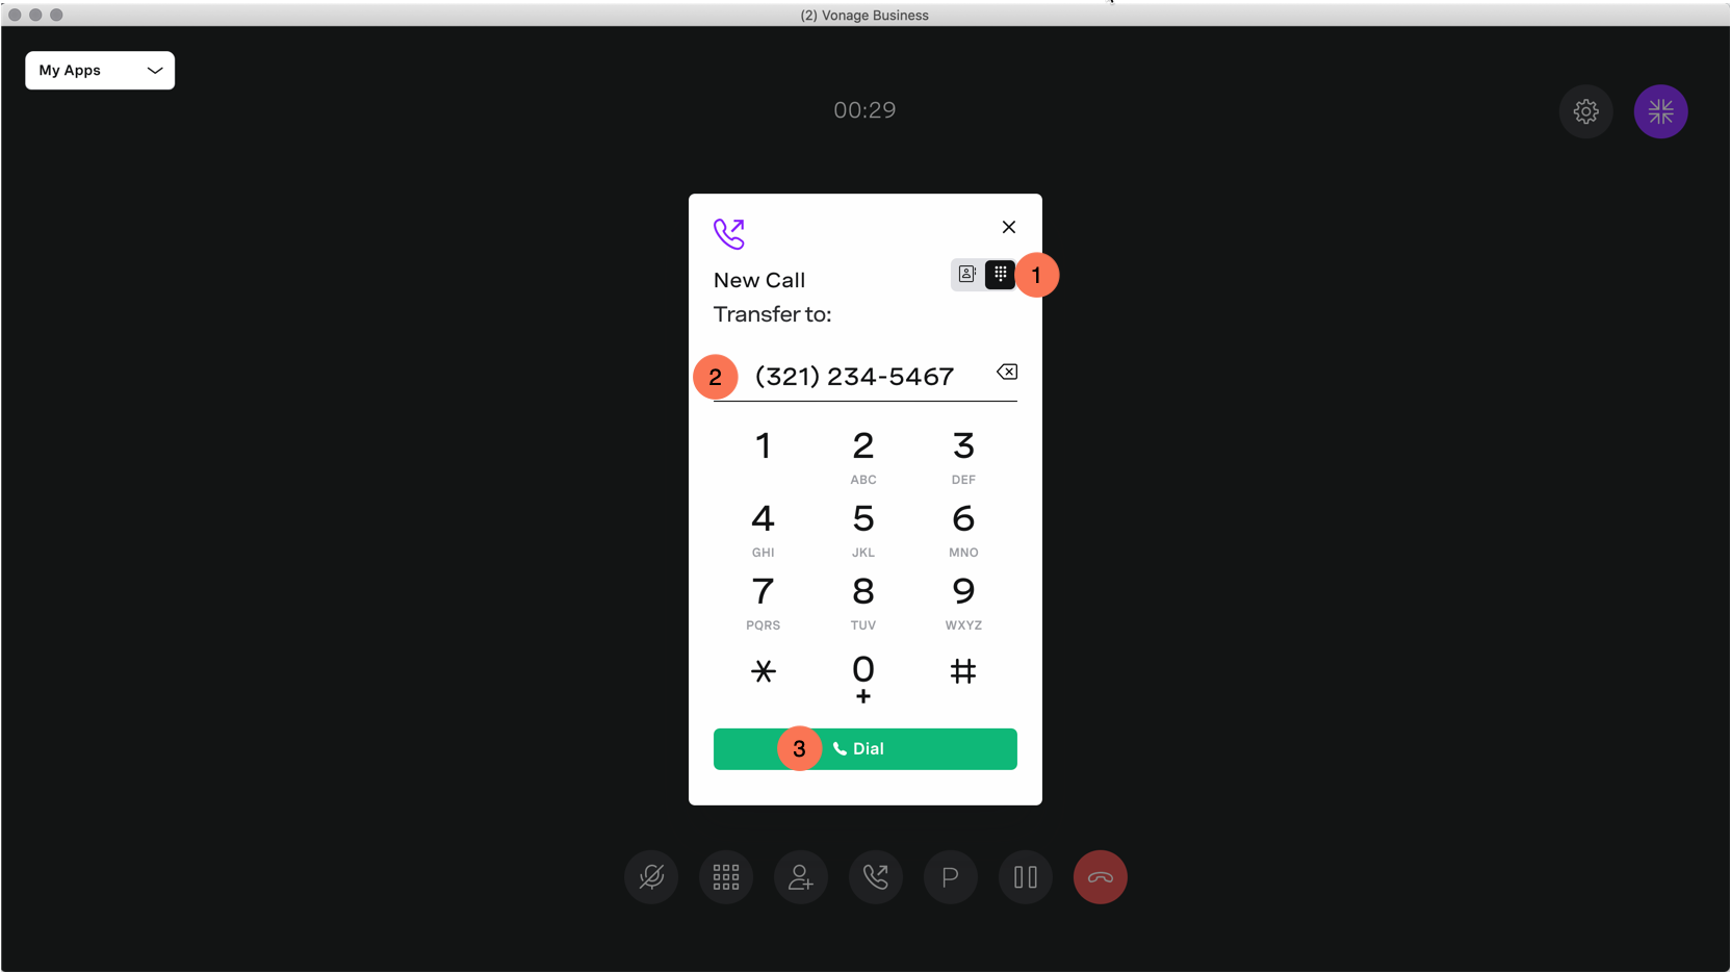
You can also transfer to another recipient via the Dial Pad. From the Transfer To window:
- Click the Dial Pad icon.
- Enter the valid extension or 10-digit number.
- Click the Dial button. Your transfer is now complete.
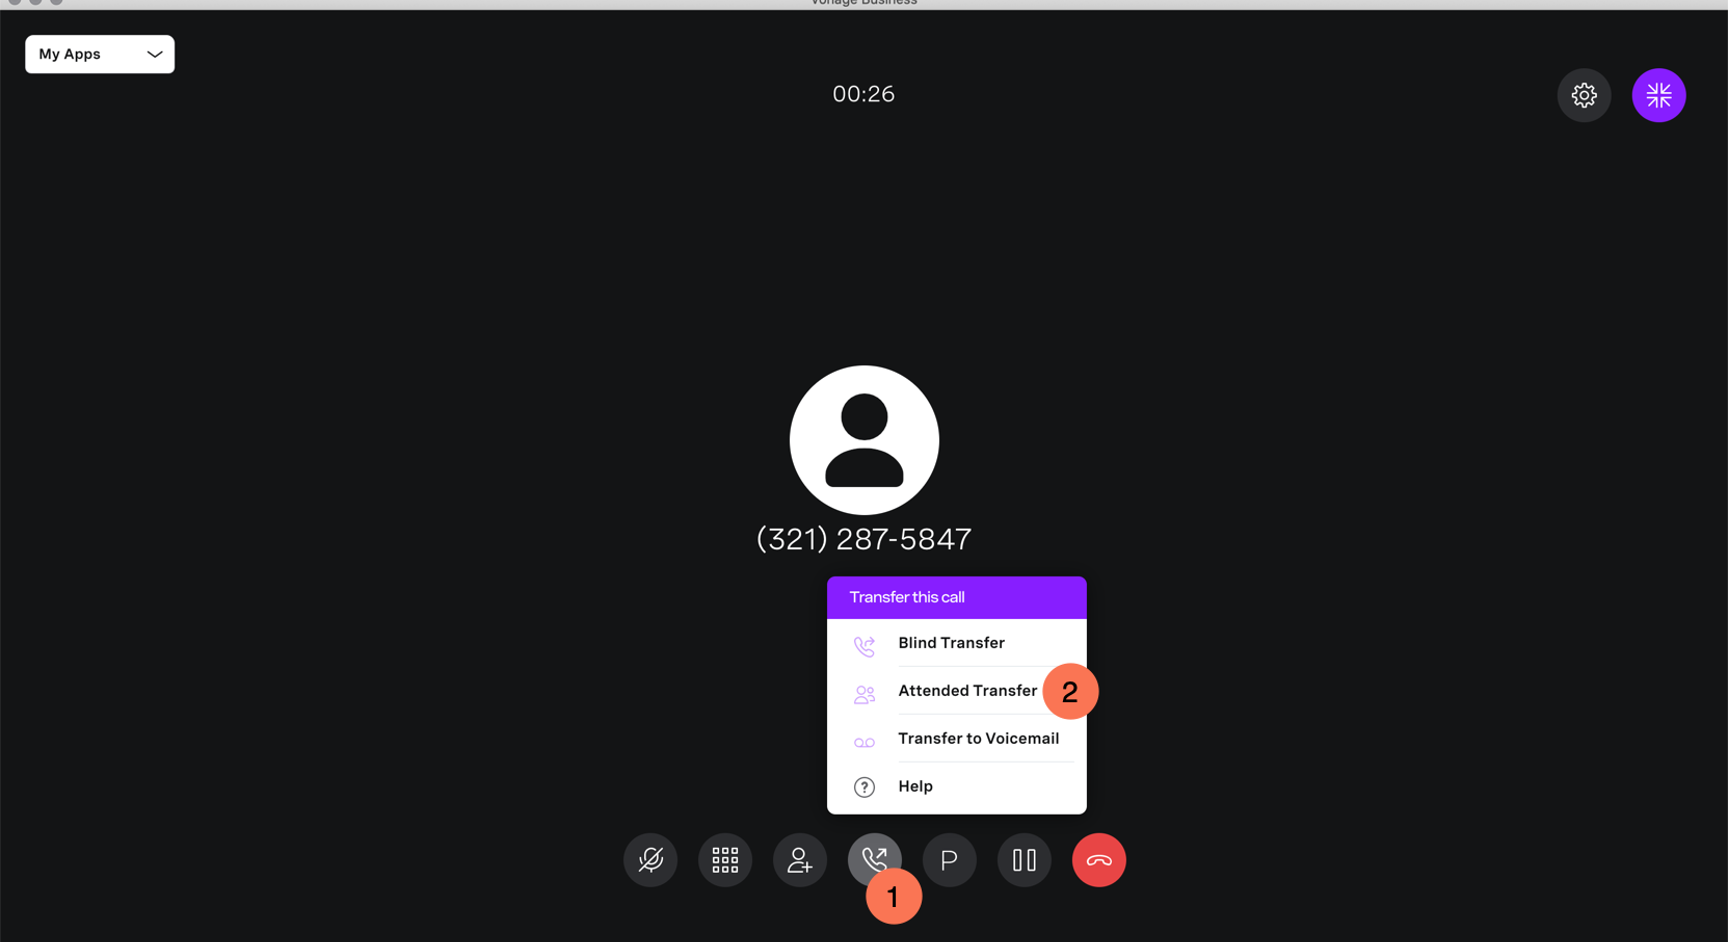
- A Consulted (or announced) Transfer is performed when you announce the call to the recipient prior to transferring the call. To conduct an attended transfer, while on a call:
- Click the Transfer button.
- Proceed to select an Attended Transfer.
- From the Contact panel, select the recipient you wish to transfer to.
- Click the Call Button.
- When the party answers, announce the call and click transfer one last time. Your call will now be transferred.

You can also transfer to another recipient via the Dial Pad. From the Transfer To window:
- Click the Dial Pad icon.
- Enter the valid extension or 10-digit number.
- Click the Dial button.
- When the party answers, announce the call and click transfer one last time. Your call will now be transferred.
- A Direct-to-Voicemail Transfer is performed when you wish to transfer a call directly to another user’s voicemail. To conduct a transfer to voicemail, while on an active call:
- Click the Transfer button.
- Proceed to select Transfer to Voicemail.
- From the Contact panel, select the recipient you wish to transfer too and click the Transfer Button. Your call will now be transferred to their voicemail.
To Park and Unpark a call:
To park a call while on an active call:
- Press the Park icon.
- The call will now be displayed within the table of the Parked Calls areas on the Receptionist console.
- To retrieve a Parked call, click the Answer button next to the parked call, or, from the dial pad, dial *104 and listen to the prompts.

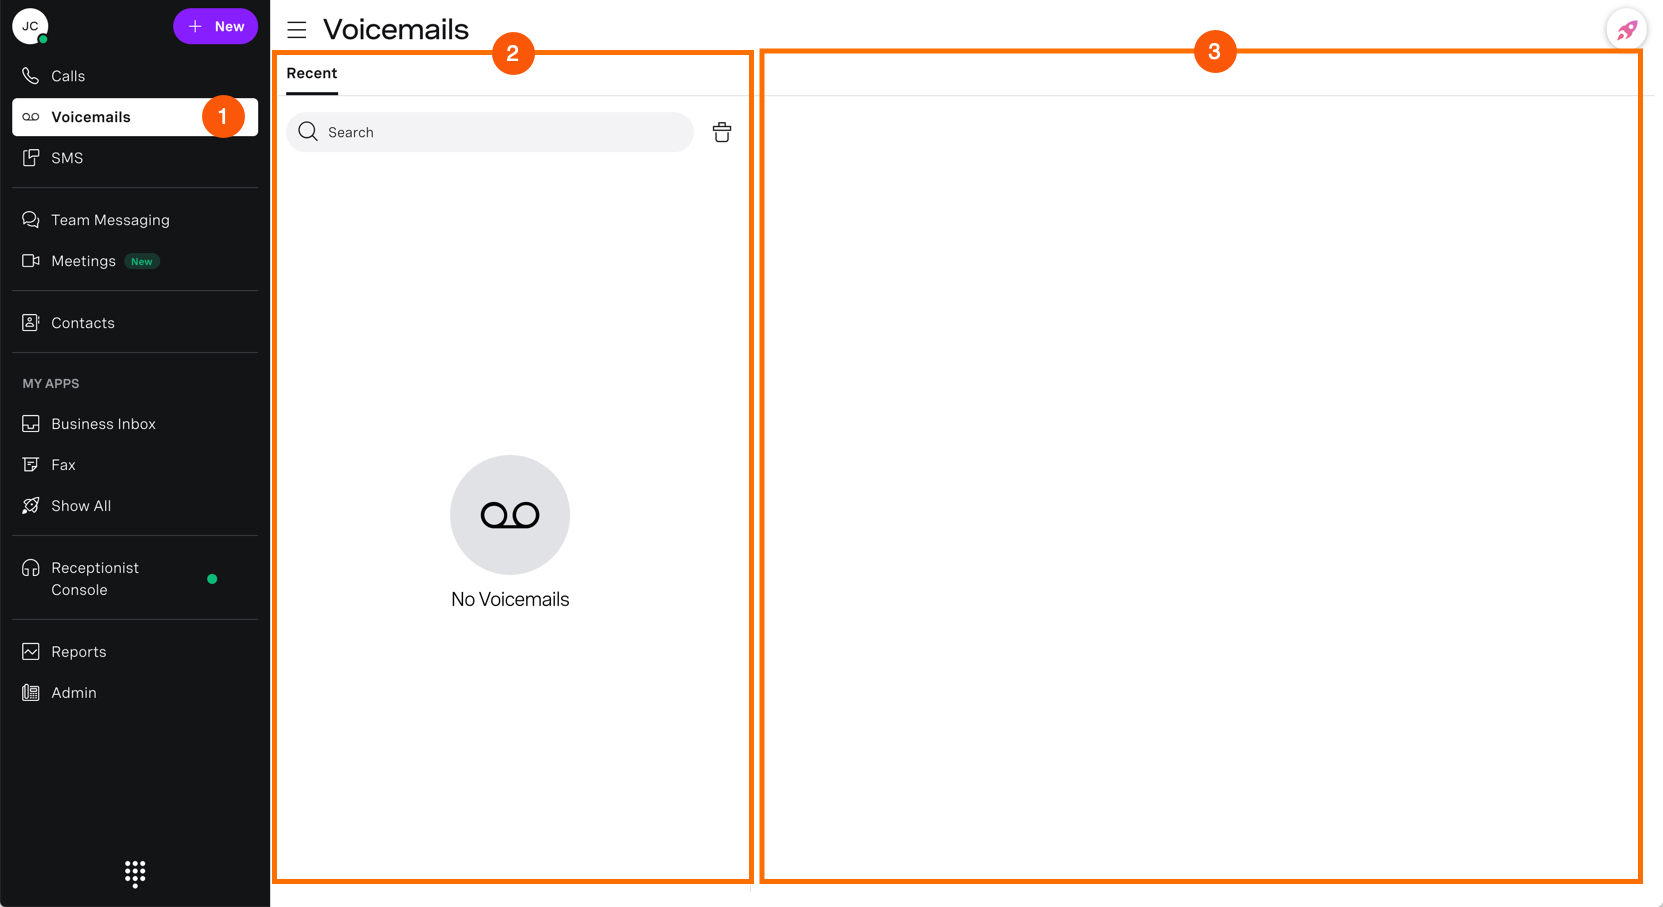
How to access your voicemail:
To access your voicemails, click on the Voicemails tab. This page is broken into two separate areas. The first area is your voicemail window. This is where your voicemails are stored, usually by date in chronological order. The second area houses all the voicemail information and is found to the right of the voicemail window.
To listen to a message:
- Select the message in the voicemail window. The message information will display to the right.
- Click the Play Button.
- Your message will now be played.
To download the message as a .wav file:
- Within the information window, click the Download Button.
- Proceed to save the file to your computer.
To email, a voicemail message to yourself:
- Click the envelope icon.
- Proceed to enter a valid email address.
To delete a voicemail message:
- Click on the trash icon.
- A verification will appear to confirm your deletion.
- Click Delete. Your message will now be removed from the voicemail section.
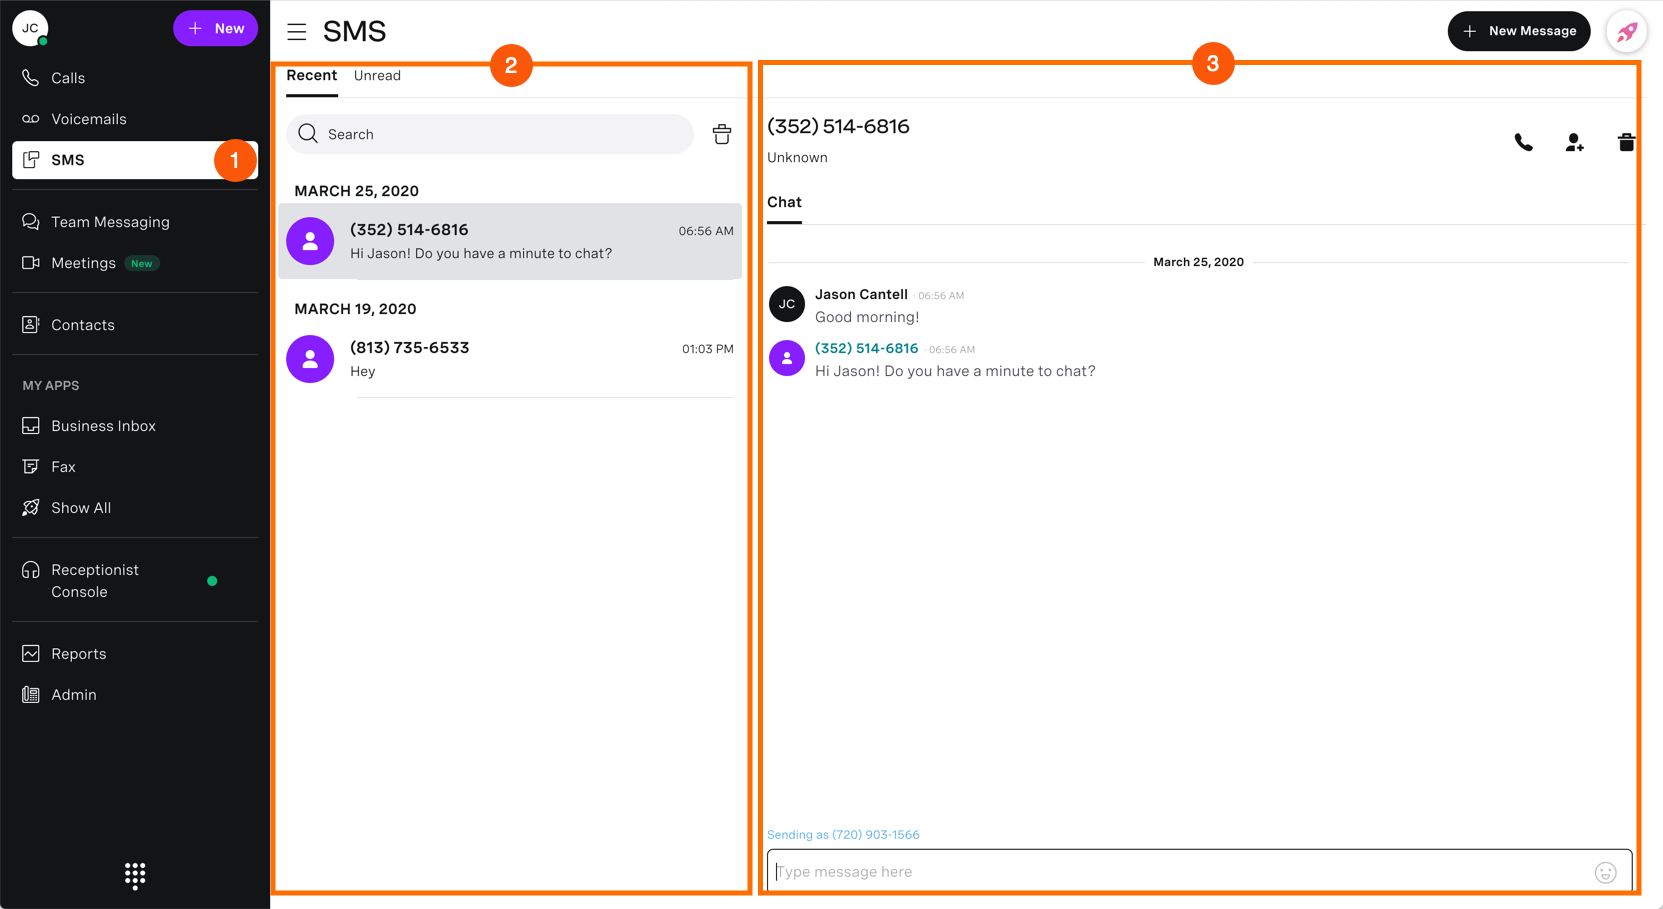
How to use the Short Message Service (SMS):
To access the recipient’s Message Services (SMS), click on the SMS tab. This page is broken into two separate areas. The first area is your SMS text window. This is where your messages are stored, usually by date in chronological order and recipient. The second area houses all the SMS text information and is found to the right of the SMS text window. This section will change depending on the selected SMS message.
To send a new message:
- Click on the new Message Button.
- Enter the recipient’s name or a number and click the green arrow icon.
- Proceed to enter your message within the Type Message Here field.
- Press enter when you are ready for your message to be sent.


To delete an SMS message:
- Click on the trash icon.
- A verification box will appear to confirm your deletion.
- Click Delete. Your SMS message will now be deleted.

If you have more than one SMS message you wish to delete:
- Click the trash icon within your SMS text window.
- Select the message or messages you want to delete by checking the checkboxes next to each message.
- When finished, click Delete.
- A verification box will appear to confirm your deletion. Click Delete. Your SMS message will now be deleted.

How to send a Fax:
To access your faxes, click on the Fax tab. This page is broken into two separate areas. The first area is your fax message window. This is where your recent, pending and failed faxes are stored, usually by date in chronological order and recipient. The second area houses all the fax message information and is found to the right of the fax message window. This section will change depending on the selected fax message.

To send a new message:
- Click on the New Fax button. From the drop-down menu, select your Sending As number.
- Enter the recipient’s name or number in the search field and select the recipients below.
- Click the Next button.
- Proceed to attach the document by clicking the Attach File button.
- Located the file on your computer and click Open. Once uploaded, your data will appear here. Click Preview to view the message before sending it.
- Once you are satisfied with how it looks, click the Send button.

Please Note: If you want to include a cover page, make sure the “Use Cover Page” checkbox is selected, and the information is placed correctly in the cover page information fields. If you do not wish to use a cover page, please leave this box unchecked.

Your fax will now be in pending status. If the fax is successful in transmission, you will see it in the fax message window.
How to access your Contacts:
To access your contact directory, click on the Contacts tab. This page is broken into two separate areas. The first area being your contact list window giving you access to the Directory contact list and your contact list. The second area houses all the contact information and is found to the right of the contact list window. This section will change depending on the selected contact.

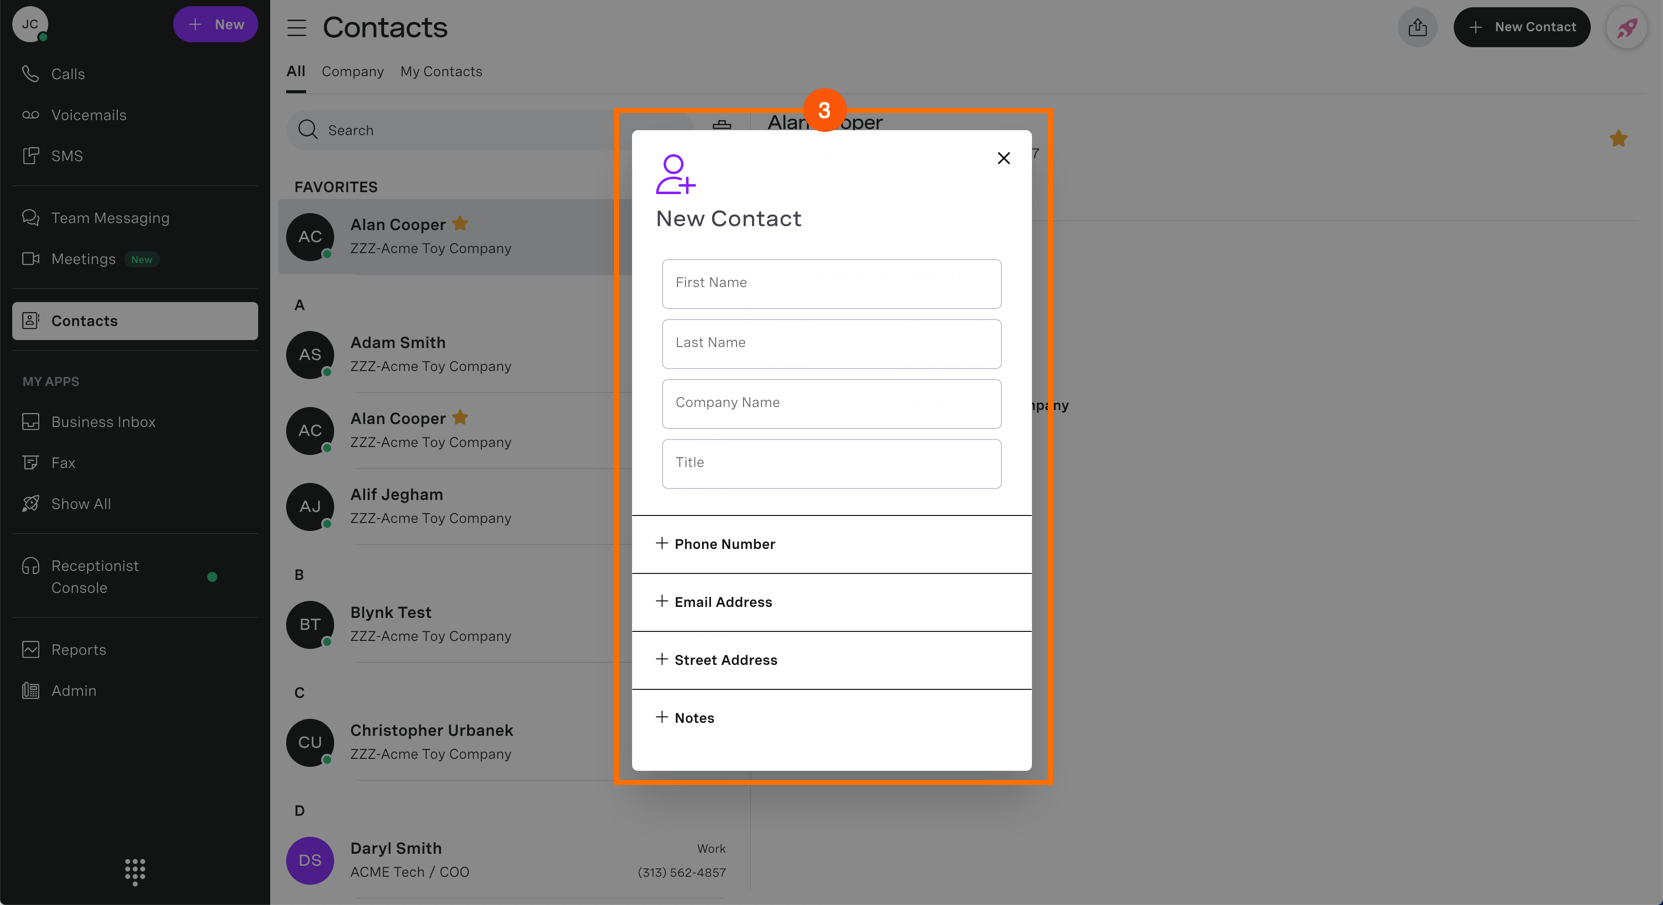
How to add new Contacts:
To add a new contact:
- Click on the New Contact button.
- The Add Contact window appears.
- Insert the necessary information in the appropriate fields.
- When finished, click on the Save button. You should now see your contact listed in the My Contact table.
To delete a contact:
Note: Contacts can only be deleted from the My Contacts tab
- While in My Contacts, select a contact and click on the trash icon to the right of the contact.
- A verification box will appear to confirm your deletion.
- Click Delete . Your contact will now be deleted.

If you have more than one contact, you wish to delete:
- Click the trash icon within the My Contacts window window.
- Select the contact or contacts you want to delete by selecting the checkboxes next to each contact.
- When finished, click Delete.
- A verification box will appear to confirm your deletion. Click Delete. Your contacts will be deleted.

To add a contact as a favorite:
- Click on the star icon either here or within the contact information screen.
- Once clicked, the star will change to solid yellow, and you will now see that contact within your Favorites list.

To remove a user from Favorites:
- Click on the Star icon again.
- You will see it’s removed when the star reverts to it’s outlined form.
How to create a Team Message:
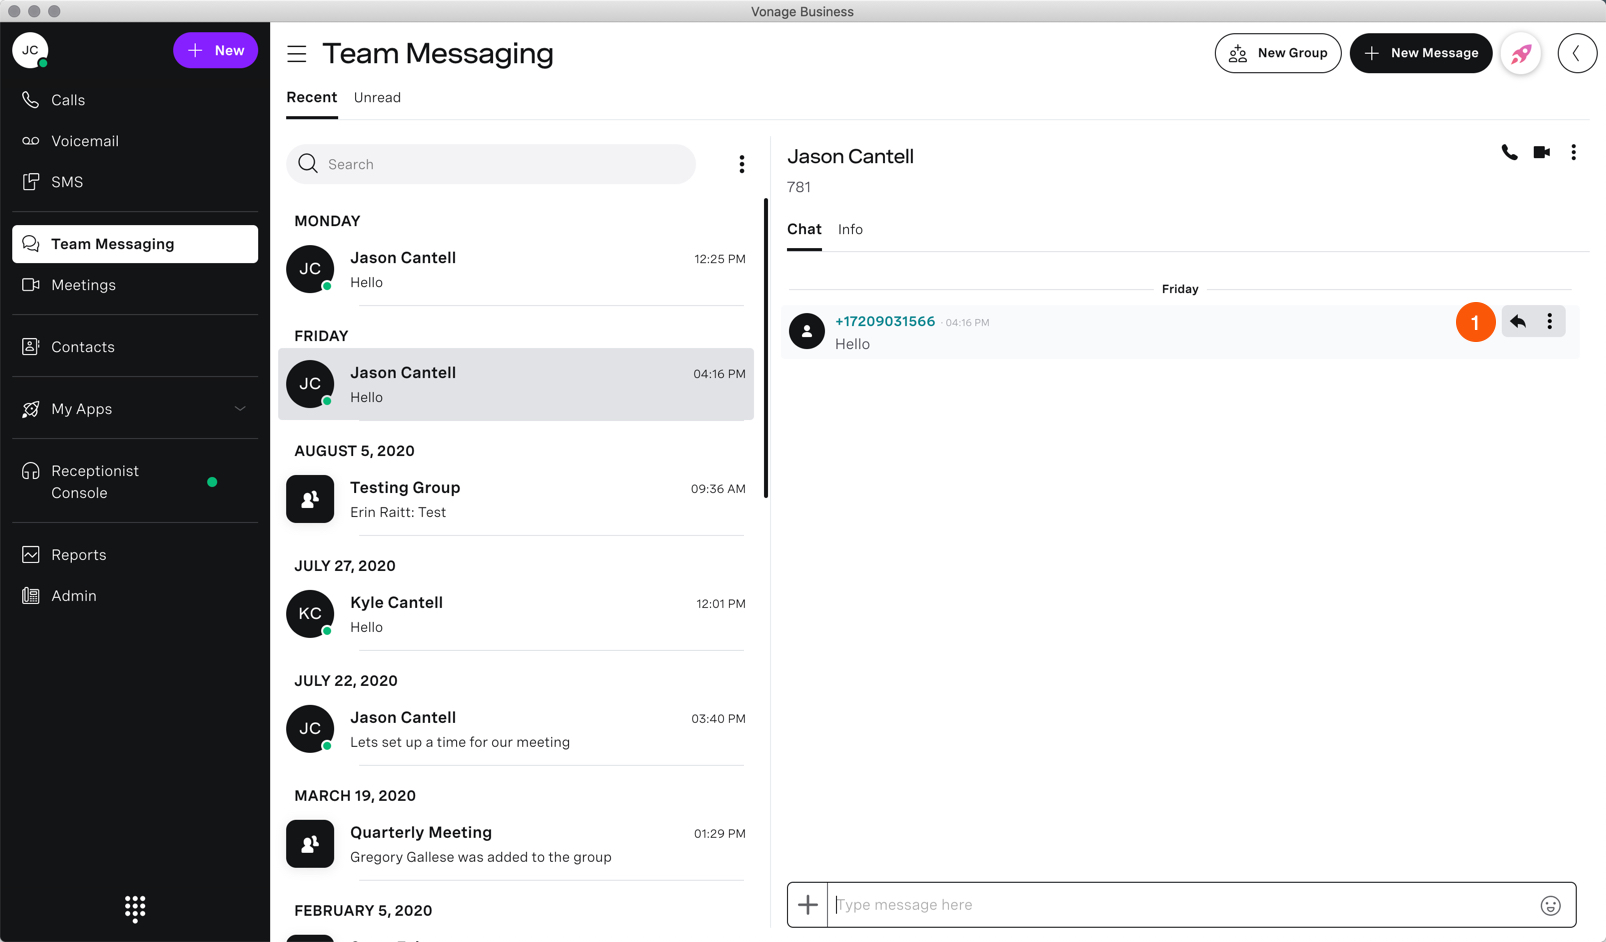
To access your Team Messages, click on the Team Messaging tab. This page is broken into two separate areas. The first area is your team messaging window. This is where your team messages are stored, usually by date in chronological order and recipient. The second area houses all the team message information and is found to the right of the team messaging window. This section will change depending on the selected team message.

To send a new team message:
- Click on the new Message Button.
- Enter the recipient’s name and click the green arrow icon.
- Proceed to enter your message within the Type Message Here field in the information area.
- Press enter when you are ready for your message to be sent.
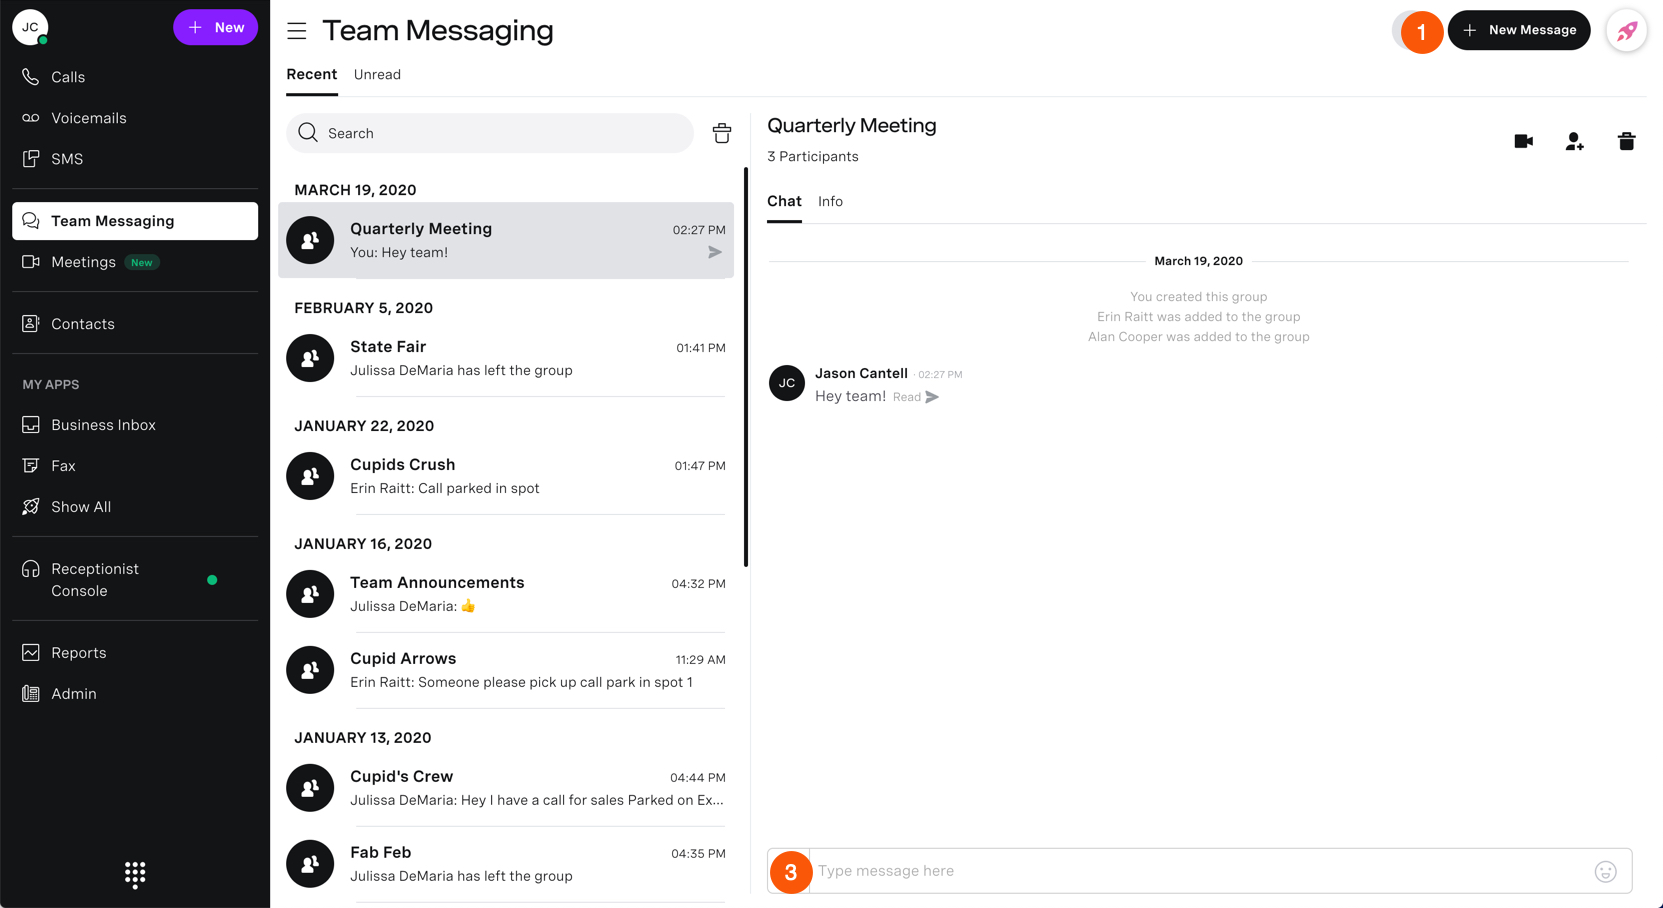
To create a new group:
- Click on the New Group icon. The new Group window will appear.
- Proceed to name the group chat.
- Once complete, add recipients by selecting from the contact list.
- Once finished, click create.
- You should now see your newly created group within the Team Messaging window.

To send a new group team message:
- Click on the group within the team messaging window.
- Proceed to enter your message within the Type Message Here field in the information area.
- Press enter when you are ready for your message to be sent.
Replying to a Team Messaging
You can also reply to a specific message:
- While hovering over any message, click on the reply arrow.
- This will allow you to respond to this message only and the reply will appear directly below the original message.
How to access and create meetings:
To access Meetings, click on the Meetings tab. This page is broken into two separate areas. The first area is your meetings window. This is where your meetings are stored, usually by date in chronological order. You can sort through these meetings by All Meetings, Ended meetings, or Missed meetings. The second area houses all the meeting information, including the time and date, participants, and meeting messages. This found to the right of the meetings window. This section will change depending on the selected meeting.

To create a new meeting:
- Click on the New Meeting button. The new Meeting Window Appears.
- Proceed to select the Meeting participants from the contact list below.
- Click Start Meeting. The Vonage Meetings window will appear with your current participants already in the meeting space. If you have outside guests joining, wait for them to enter before starting your meeting.
Please Note: If you have outside guests joining the meeting, make sure you copy your Dial-In and Web-link info to your clipboard by clicking on the Copy to Clipboard button. This is the information you will send to them via email to gain meeting access.

Once your meeting is concluded, it will appear in your meetings window.
Meetings
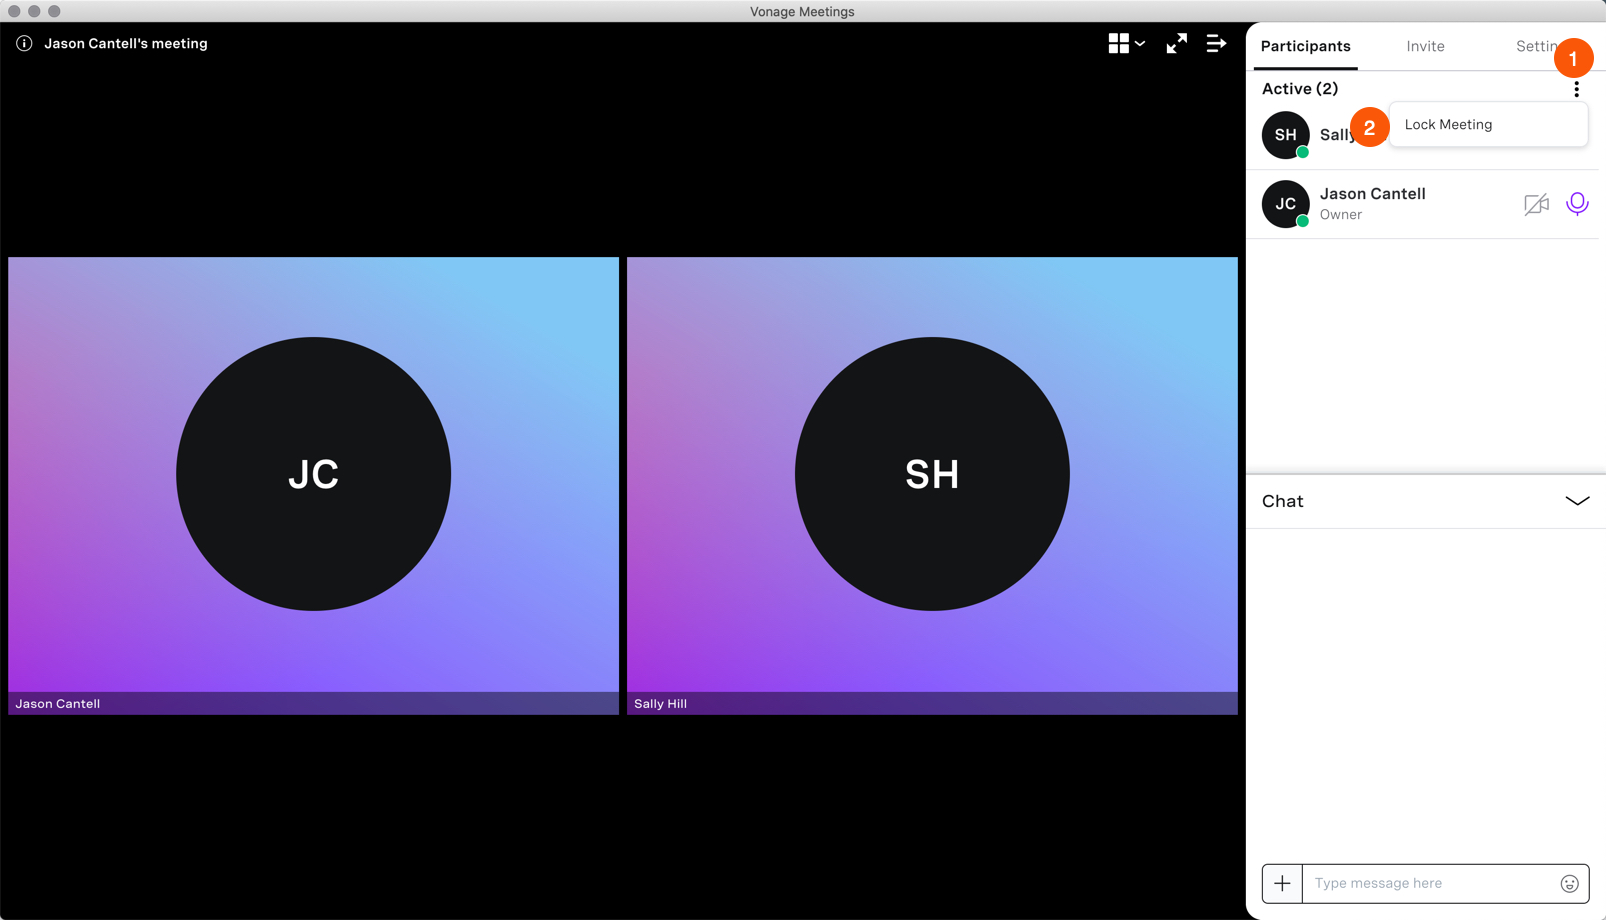
If you wish to lock your meeting so no new participants may enter, you have the option to Lock Meeting. To do this:
- Click the 3 dots within the Active participant’s tab.
- Proceed to click Lock Meeting. The meeting will now be locked.
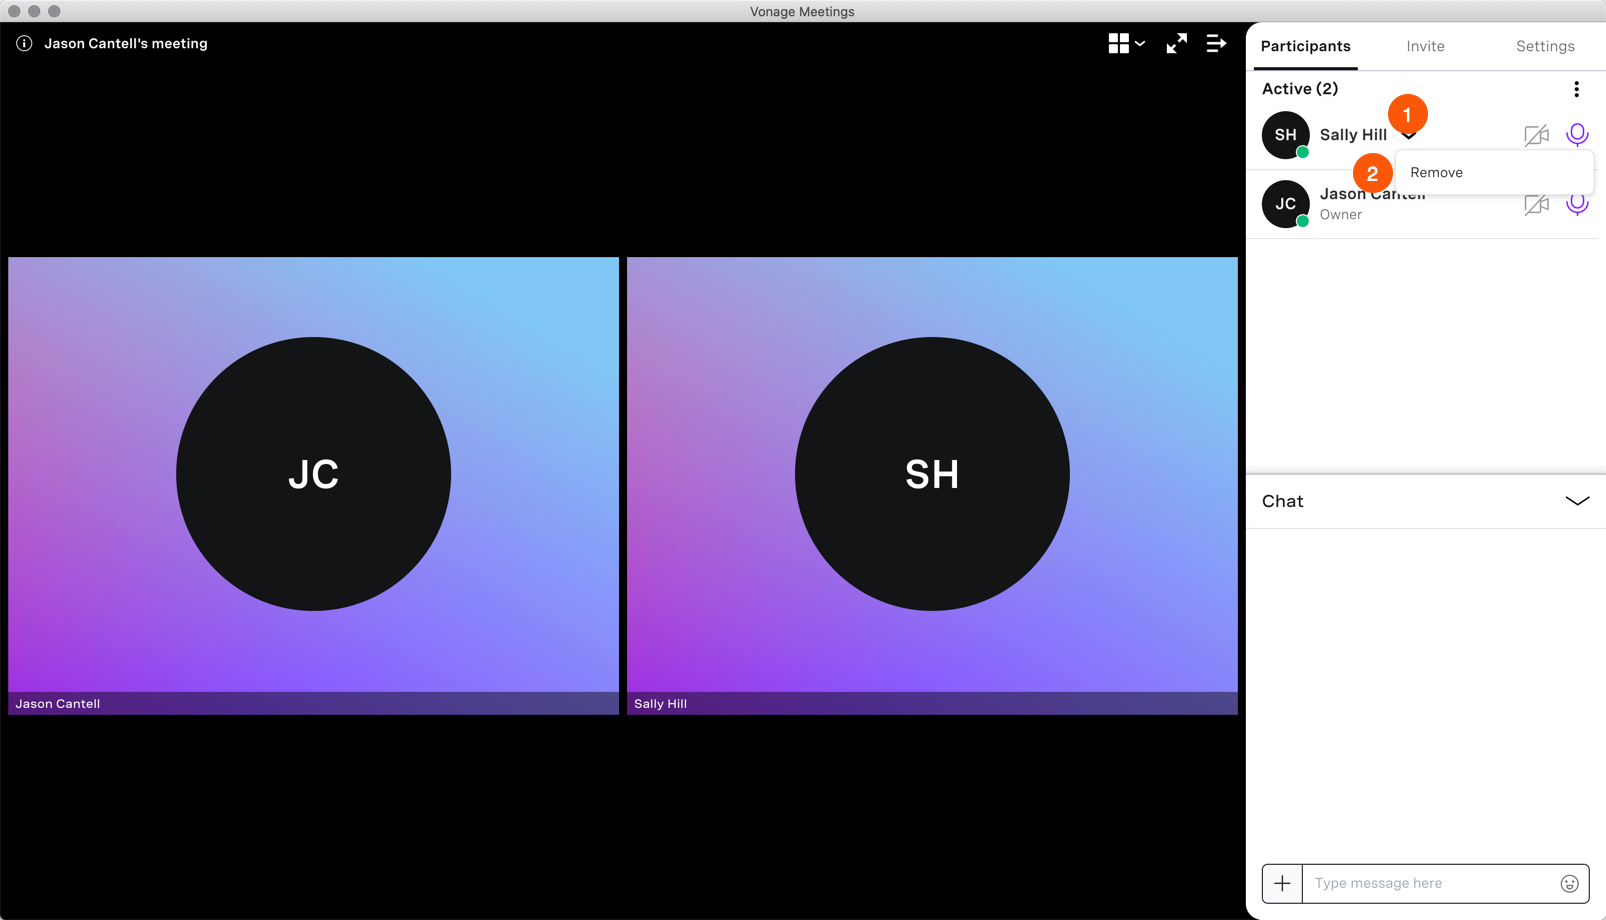
To remove participants from the meeting, hover over the participant you wish to remove. By taking this action, icons will appear on the right-hand side:
- Click the Down arrow.
- select Remove.
- Confirm your selection.
- The participant will now be removed from the current meeting.

Once your meeting is concluded, it will appear in your meetings window.
Vonage Meetings
Meeting Views
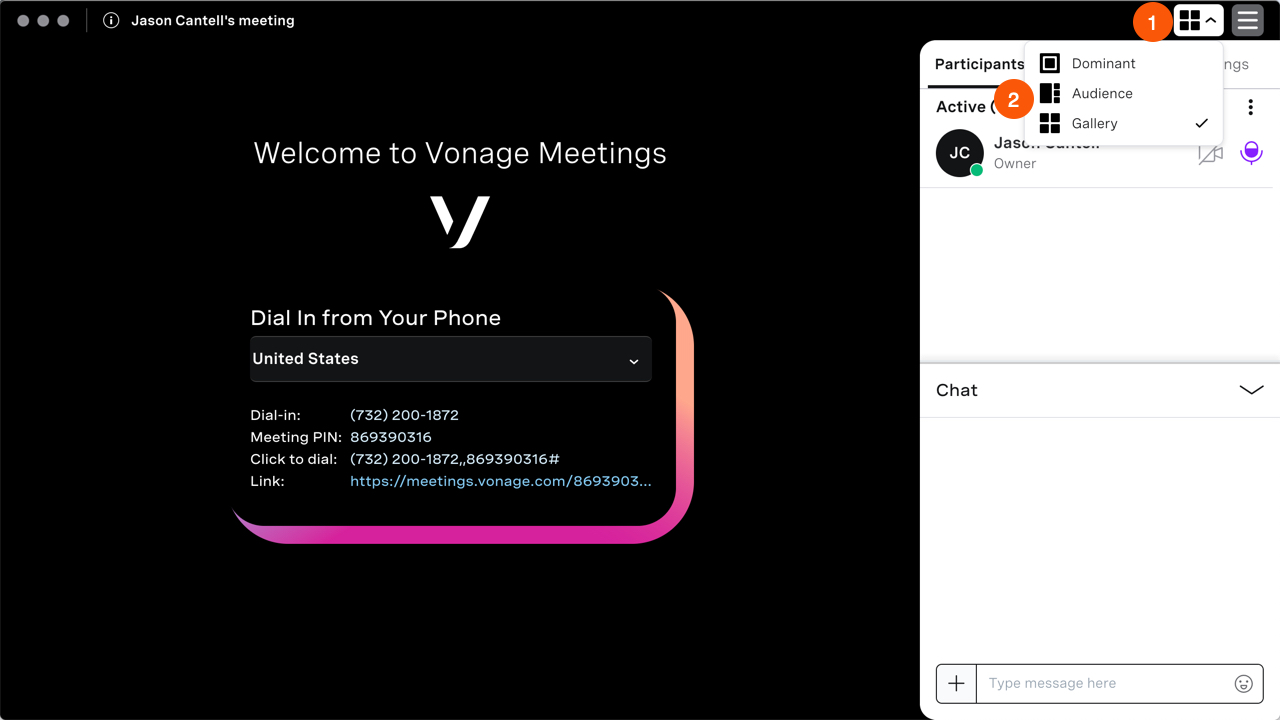
While in an active meeting, you can change the views of the video payout. To do this:
- Click on the grid icon.
- Select from the following:
- Dominant – Current person speaking.
- Audience – Current person speaking with participants in a column to the right.
- Gallery – All participants in fullscreen tile format.
- You can switch views at any time during the meeting.
Screen Sharing
You have the ability to share your screen while conducting a meeting, to do this:
- Click Screen Share from the bottom menu options.
- Select whether you wish to share your entire screen.
- Or you can share a specific application.
- When Selected, click Share. Your screen will now be shared with the meeting attendees.

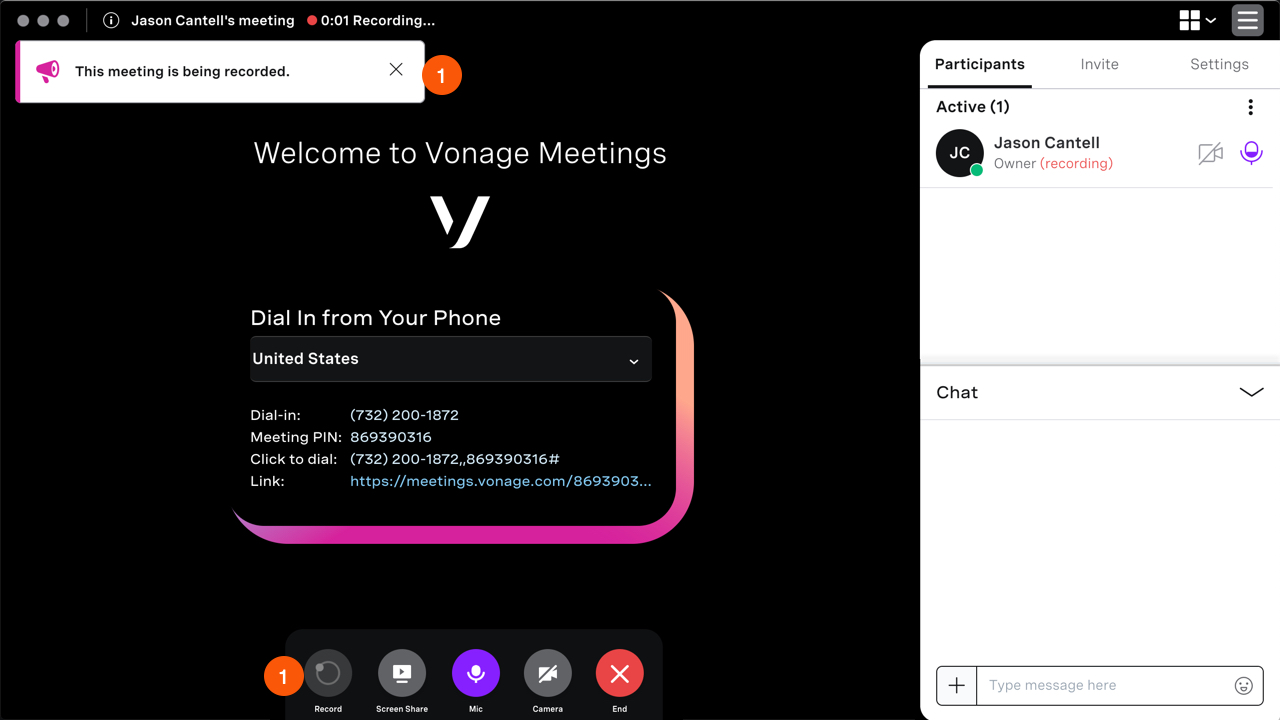
Recording Meetings
As a host, you have the ability to record meetings that will be later sent to you via email for you to download and keep a record of. To start a recording while in a meeting:
- Click on the Record icon within the bottom menu options. You will get a notification that the recording is in progress.
- When you wish to stop the recording, click the recording icon again.
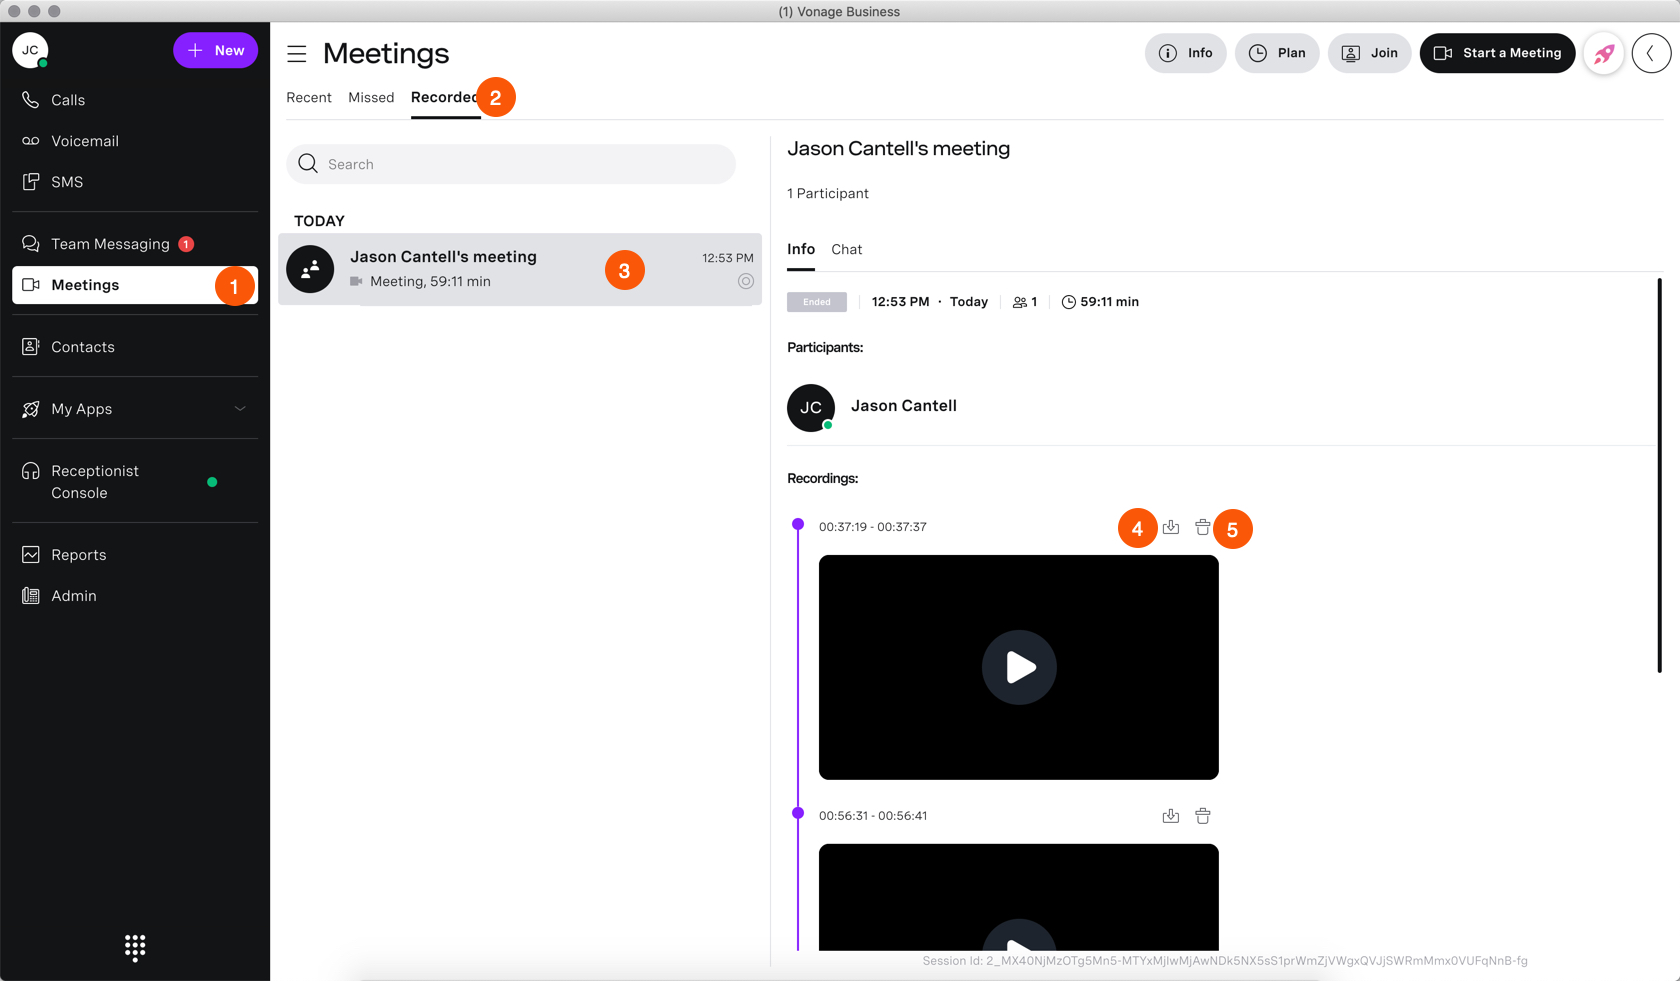
To view this recording after the meeting:
- Click Meeting from the main navigation menu.
- On the meeting page, select Recordings.
- Select the recording you want. All of the information about this meeting will be displayed on the right-hand side.
- To download a recording, click on the download icon.
- You can also delete a recording by clicking the trash icon here.
Join a Meeting
You can join the meeting in several ways. The first being by Meeting ID:
- Sign in to the Desktop App.
- Click Meetings.
- Click Join (top of the screen) and then enter the 9 digit meeting ID.
- Click Join a Meeting to join.
You can also join a meeting by Invitation. If doing by invitation, a pop-up screen displays when a contact or group invites you to join a meeting, from here:
- Click the Camera button to enable or disable your webcam.
- Click the Mic button to enable or disable your microphone.
- Click the Green Phone Icon to join or the Red Phone Icon to decline.
Finally, you can join a meeting that is already In Progress. To do this:
- Sign in to the Desktop App.
- Click Meetings and then click the meeting identified as Ongoing Meeting.
- Click the Join Meeting button.
Calendar
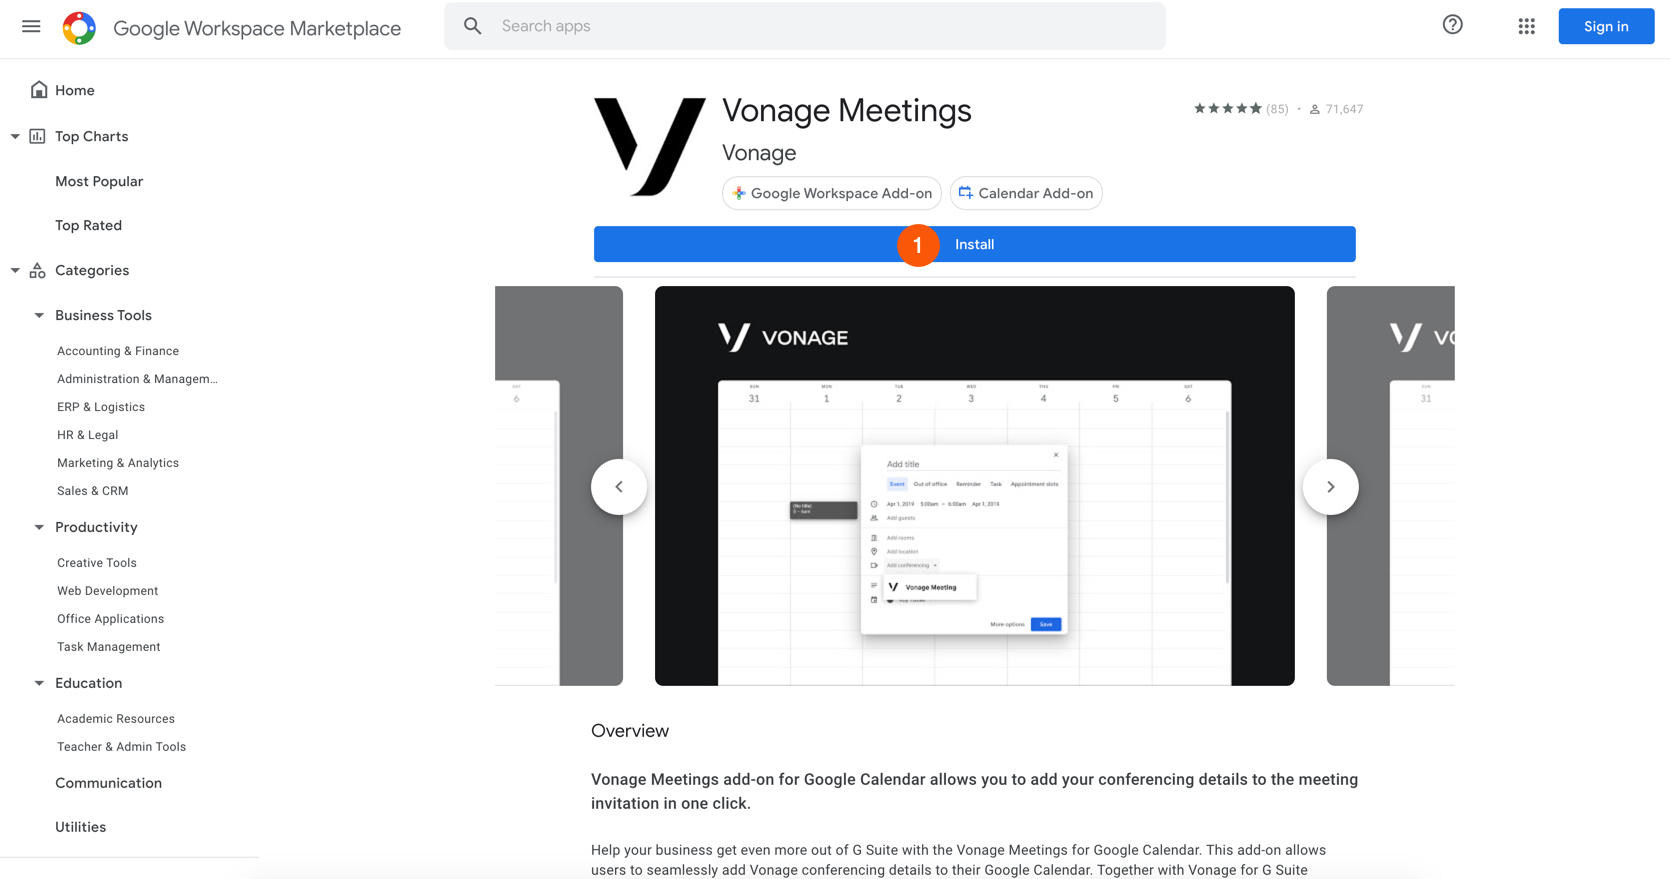
To install the Vonage Meetings Google plugin:
- Go to the Google Workplace Marketplace found here:
https://gsuite.google.com/marketplace/app/vonage_meetings/822727696970
- Click install and follow the installation procedures that will appear on the screen.
To use the Vonage Meetings plugin:
- From Google Calendar, locate the date you wish you schedule a meeting.
- When the window appears, insert the Event or Meeting title.
- Proceed to select Event.
- Enter the invitees of this meeting or event. For additional attendees, separate email addresses by commas.
- Next, select the meeting type. You can either choose the google default or choose the Vonage Meetings plugin that will generate all the information you need to successfully schedule a meeting.
- Choose Vonage Meetings.
- When complete, click Save.

Keyboard Shortcuts
New keyboard shortcuts are added to make using Meetings more efficient.
- Mute and Unmute – for PC: Ctrl+Shift+A, and for MAC: Command+Shift+A
- Camera On / Off – for PC: Ctrl+Shift+V and for MAC: Command+Shift+V
- Screen Share – for PC: Ctrl+Shift+S, and for MAC: Command+Shift+S
- Full Screen On / Off – for PC: Ctrl+Shift+F, and for MAC: Command+Shift+F
How to access the Receptionist Console:
To access the receptionist console, click on the Receptionist Console tab. This page is broken into four distinct areas, including Call, Contacts, Parked Calls, and Queues.

In Call Actions
The call console will show the calls currently waiting to be answered with the following details:
- Caller Name and/or Number.
- Status.
- Duration of Wait time.
To answer an incoming call:
- Click on the answer icon.
- Your call will now show above the Call Console panel.
To mute a call, while on the active call:
- Press the Mute icon. The caller will no longer be able to hear.
- Reversely, to unmute the call, click the Mute button again.
To transfer a call:
- Click the Transfer icon, select how you wish to transfer from the following:
- A Blind (or unannounced) Transfer takes place when you transfer a call to someone else without announcing the call first. To conduct a blind transfer, while on an active call:
- Hover over the Transfer button.
- Select Blind Transfer from the popup menu
- Click the Transfer button. Your call will now be transferred.
From the Contact panel, select the recipient you wish to transfer to from your saved contacts list, or search for a saved contact by typing any part of their first name or last name in the search box.
Note: If you are transferring the call to a number that is not saved in your contacts, just type the full 10-digit number into the search box.
- A Consulted (or announced) Transfer is performed when you announce the call to the recipient prior to transferring the call. To conduct an attended transfer, while on a call:
- Hover over the Transfer button.
- Proceed to select an Attended Transfer.
- From the Contact panel, select the recipient you wish to transfer to from your saved contacts list, or search for a saved contact by typing any part of their first name or last name in the search box.
- Click the Call Button.
- When the party answers, announce the call and click transfer again. . Your call will now be transferred.
Note: If you are transferring the call to a number that is not saved in your contacts, just type the full 10-digit number into the search box.
- A Direct-to-Voicemail Transfer is performed when you wish to transfer a call directly to another user’s voicemail. To conduct a transfer to voicemail, while on an active call:
- Hover over the Transfer button.
- Select Transfer to Voicemail.
- From the Contact panel, select the recipient you wish to transfer to and click the Transfer Button. Your call will now be transferred to their voicemail.
Note: You can also blind transfer a call by dragging the call and dropping it on its intended recipient in your contact list.
Note: you can also complete a Transfer to Voicemail by dialing **
Contacts
The console will show the companies contacts with the following details:
- Contact Name.
- Contact extension number.
- Call Status.
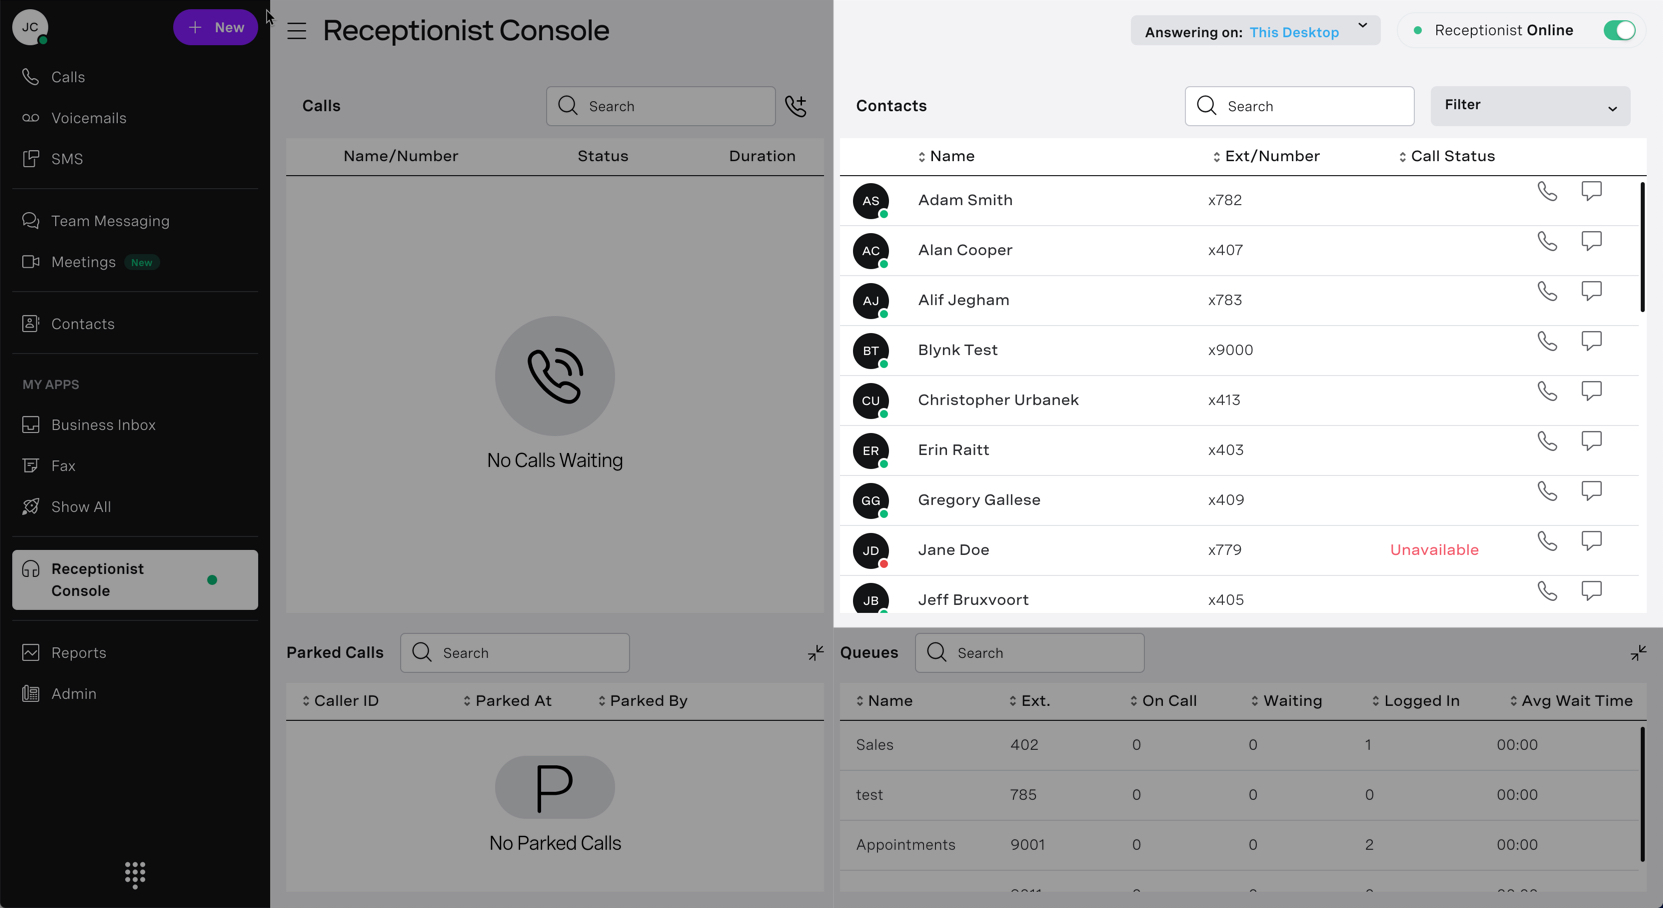
Within this panel, you also have the ability to call or message the contact from the receptionist console by clicking the respective icons.
Parked Calls
The console will show all the parked calls with the following details:
- Caller ID.
- Parking number.
- Time passed since the call was parked.
- Parked by which extension/user.
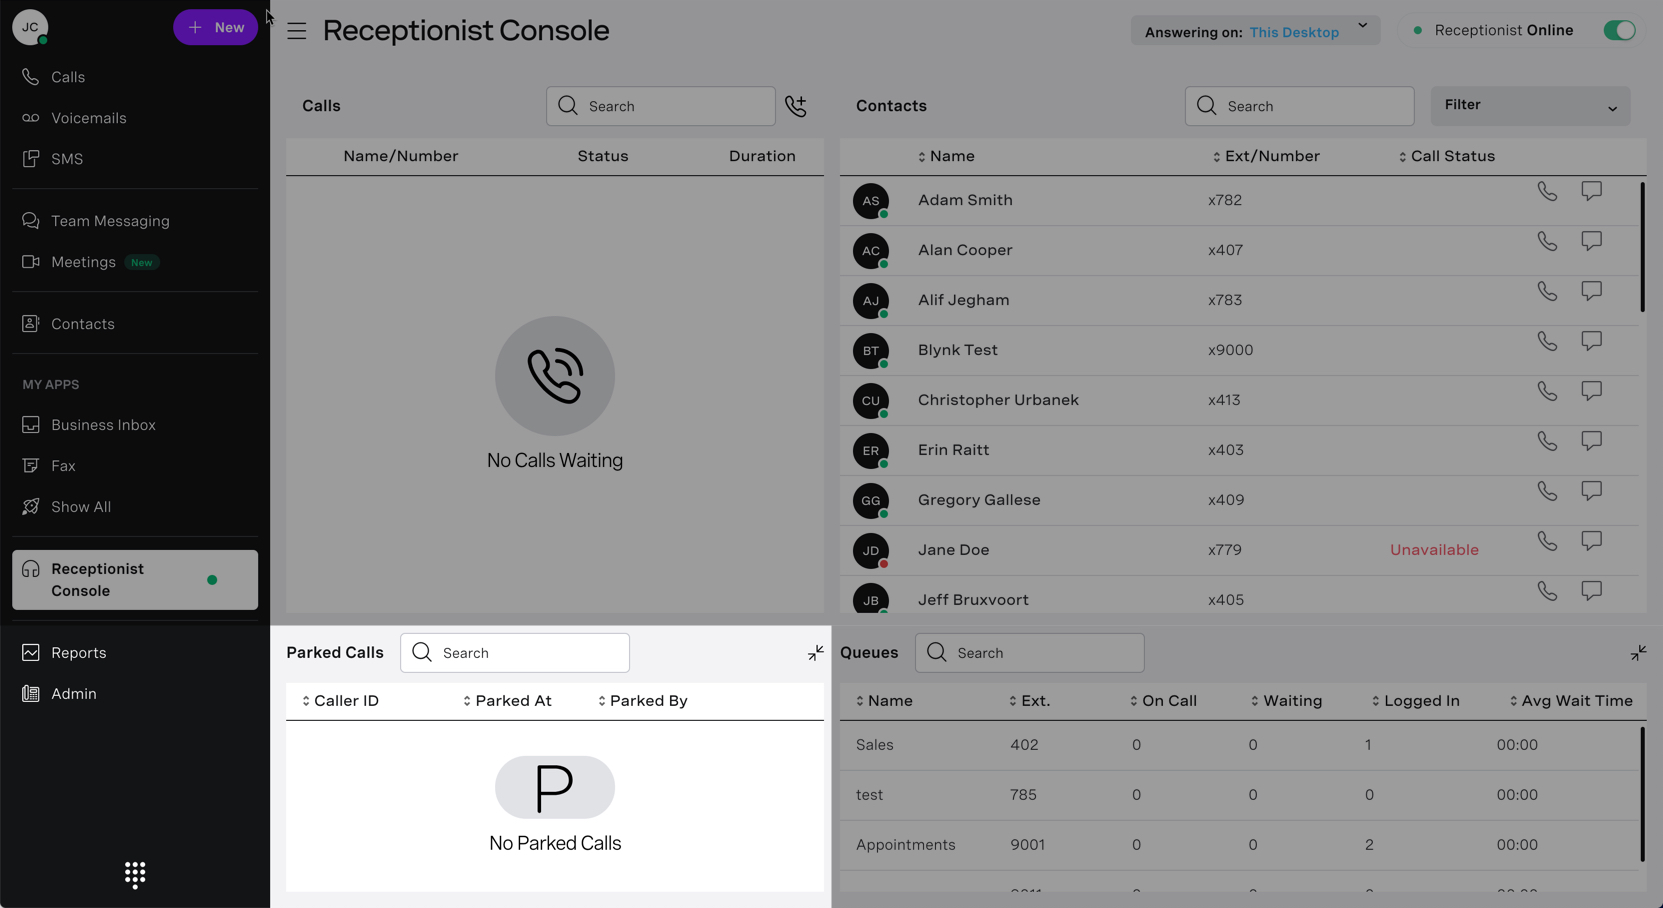
If a call is parked, you can click the Answer to unpark the call.
Please Note: When Unparking a call, the caller ID on the active call will show up as *104* plus the spot number where the call was parked.
Queues
The console will show all the queues available to take calls in the company, with the following details:
- Name of the queue.
- Extension number of the queue.
- How many agents on a call.
- How many calls are waiting to be answered in the queue.
- How many agents are logged into the queue.
- Avg wait time for all waiting calls.

You may transfer to a specific queue while on an active call, by clicking on the Transfer icon with the Queues Panel. Once clicked, the call is transferred to this queue. You will be able to see the call here.
Reports
You have the following options to use while on the reports page. You can:
- Download the Report – by clicking here, you can download the current report you have customized either in a PDF or CSV file. Click the Download Button and a drop-down menu will appear. After choosing PDF or CSV for the file type, a Save As dialog box will appear where you can modify the file name and save the file to your computer.
- Print the Report – by clicking here, a Print dialog box will appear and you can print the report you are currently viewing.
- Email the Report- by clicking here, you can email the current report to one or multiple recipients. In the email dialog box, enter one or more email addresses separated by commas and a short message if desired. Once finished, click Send, an email with the report will be sent to the recipients.
